How to Make Your Own Pinterest Worthy Christmas Wreath!
Make this pretty Christmas wreath with this simple formula! Now you can have a Pinterest inspired wreath easily (and its mistake proof)!

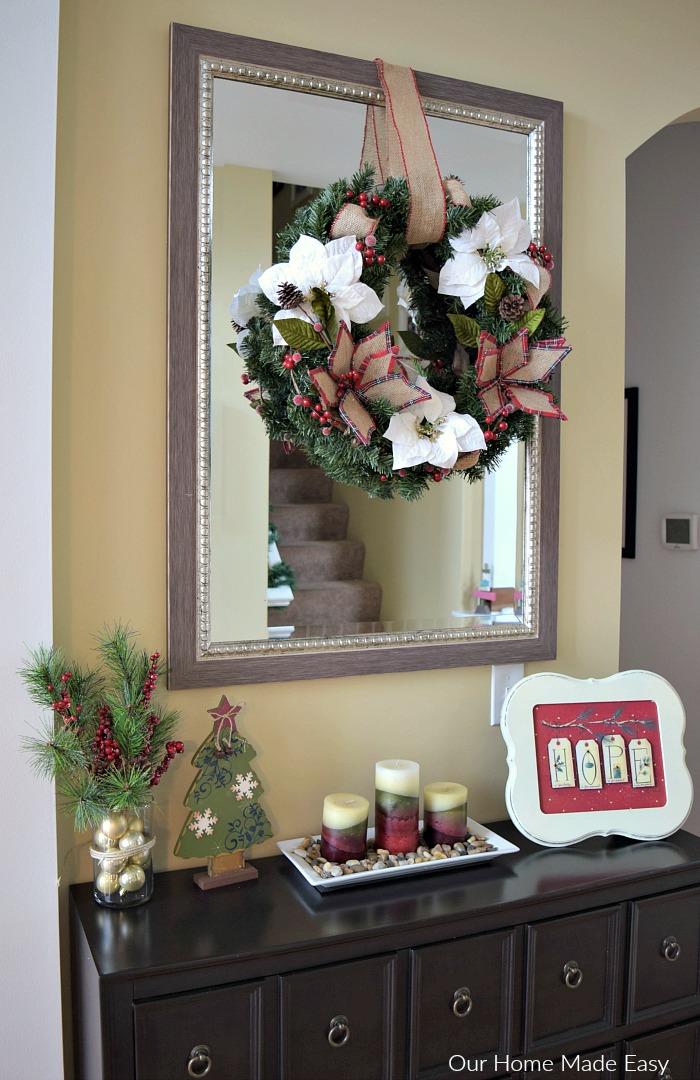
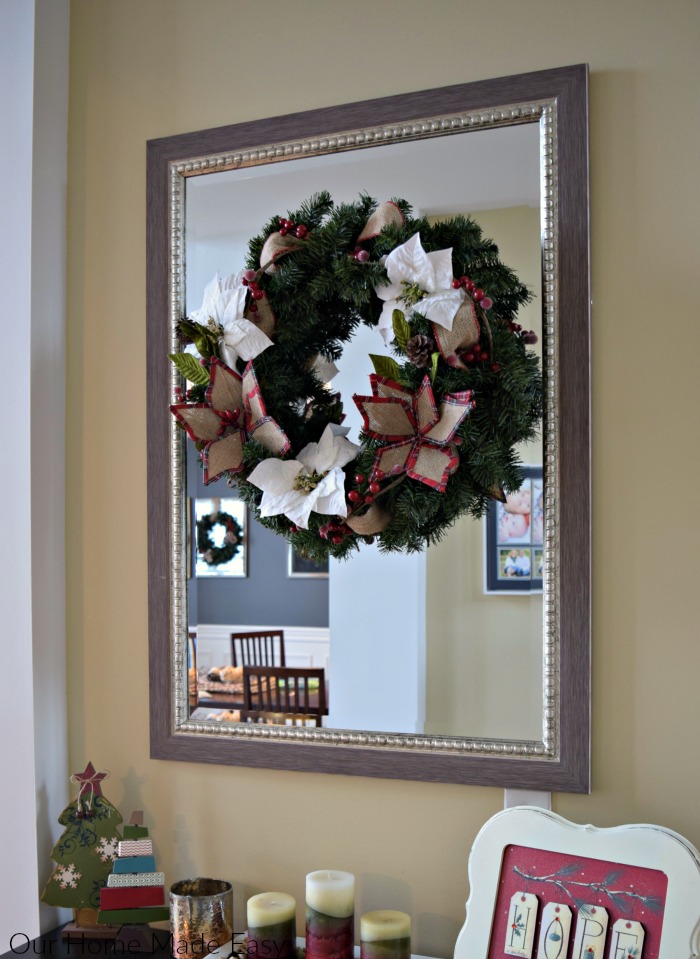
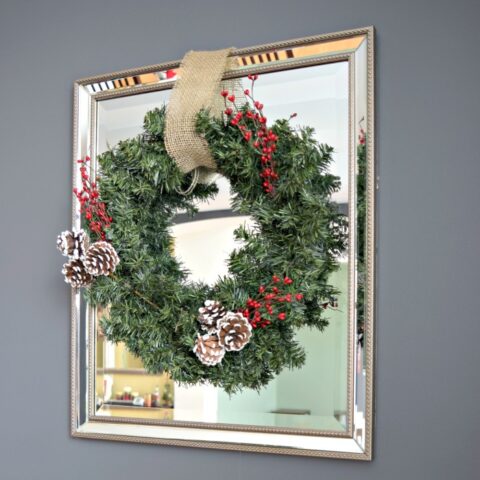
Hey there! Last week I posted our living room looking snazzy for Christmas time. I won’t lie, I’ll miss the ‘extra stuff’ when it goes away at the end of the month. But before that happens– I had to add more decor that I liked (it’s a thing for me this year) and it had to be budget-friendly. So when I saw that my mirror was looking a bit lonesome, I decided it needed its own Christmas wreath!
Last month I shared my easy wreaths for our dining room. So why another wreath DIY? I had some inquiries on how to really make a “Pinterest-y” wreath step-by-step. Could I do that? Absolutely!
I know that sometimes the idea of going to a store and picking out what you think you need can be overwhelming. I will step you through the process so that when you decide to make a wreath, it’s perfect for your home.
This post contains affiliate links. If you shop from my blog, I may be compensated for clicks or purchases that you make. Thank you for supporting ‘Our Home Made Easy!’ Read my disclaimer page for more information.
Have you ever made one from scratch before? Beautiful wreaths are all over Pinterest these days and you can make one, too. They are super easy and I will step you through the entire process. Bonus to this Christmas wreath? It required zero hot glue, so you can literally change it out each year as your decor tastes change (me! me!).
Supplies Needed for a Pinterest Inspired Christmas Wreath
-
- Budget Wreath (I used this one)
- 1 style of Ribbon (Similar One)
- 1 Garland (I used this one in red)
- Decoration Picks (You can find them at Michaels, Jo-Ann Fabrics, or Hobby Lobby)
- Large Suction Cup or Over the Door Wreath Hanger
- Wreath Wire
- Optional: Large Bow or Accent Sign / Decor
Measure Your Space
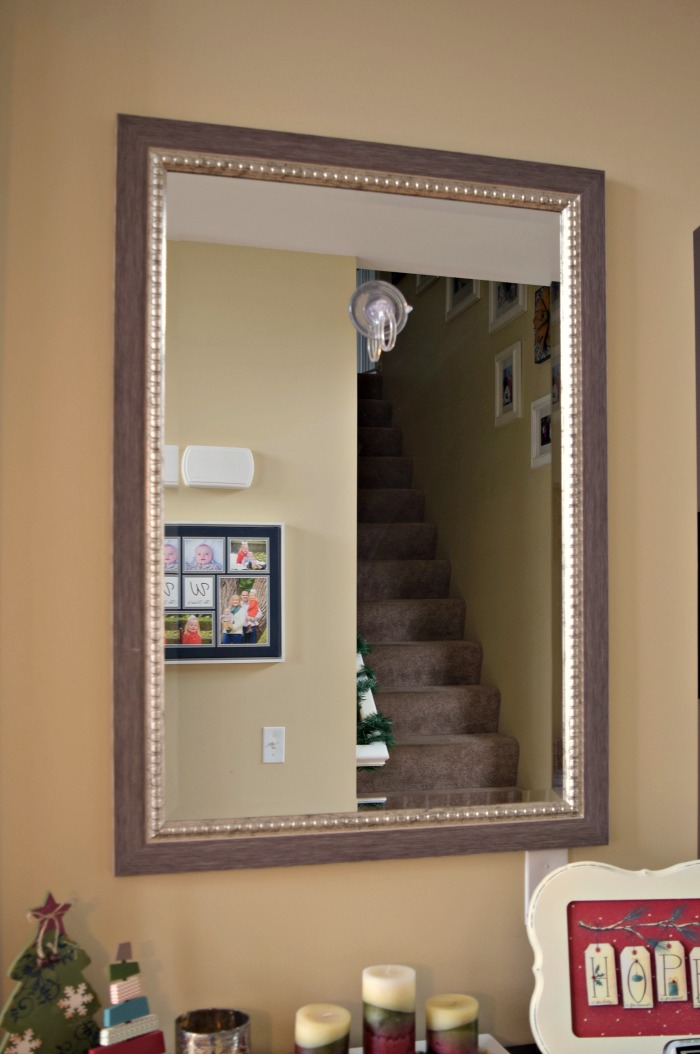
This is uneventful, but necessary. If I had listened to myself, I wouldn’t have initially hung an 18″ wreath on my mirror. It looked anemic in scale to the mirror. Measure your space to see size is best for you. For this mirror, I used a 24″ green wreath. For the fall time, I also used 24″ (duh, Brittany), so I should’ve kept that measurement going. To give you an idea, I used 15″ wreaths on the mirrors in our dining room.
Standard sizes of wreaths are 15″, 18, or 24″. Pick which one will work best for you.
Find a Great Sale
This one is pretty big. This weekend at Michael’s they had 70% handcrafted wreaths. honestly, if I had found one that used materials I wanted (burlap, red, plaid), I would’ve bought it at that price. Making your own isn’t always cheaper. However, making something custom and fits in your house is worth exponentially more than generic if you’ll toss in next year. Make sense?
Anyways. Choose a day to go when there is a great sale. Last weekend both Michael’s and Jo-Ann Fabrics had 50%-60% off their Holiday floral items. Almost everything you’ll need for a wreath will fall under the floral category. While the picks you’ll choose are relatively inexpensive, they add up quickly to the total cost!
Find a Surrogate Wreath
When you are in the store, you’ll need to decide whether you want a green wreath, like the one I made, or a grapevine one. Grapevine is brown and rustic appearance. You can see an example of one here (15 Minute Rustic Wreath). You may already have a wreath at home and that’s great. You can still plan your project in the store.
Find a wreath in same size and carry it around the store with you as you plan. Don’t forget to put it away at the end otherwise, you’ll end with two wreaths needing styled. 😉
Now that you have a wreath in hand, you can begin planning in the store.
Pick a Ribbon
Your ribbon should be 2-3″ in width. Think of the ribbon as being a supplemental texture to your wreath. I used a burlap base with red trim for my Christmas wreath. For my outdoor fall wreath, I used a fun lime green/white polka dot grosgrain ribbon. Both add dimension and aren’t the focal point of the wreath.
The ribbon doesn’t have to be perfect…. it only needs to be a contrast against the wreath you chose.
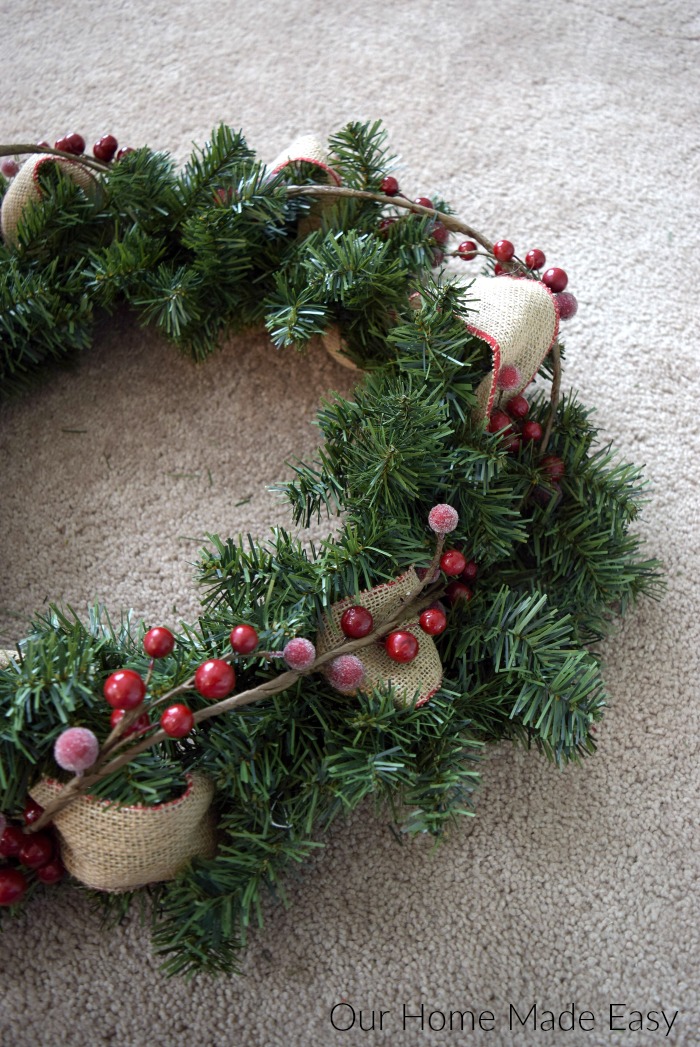
Pick a Garland
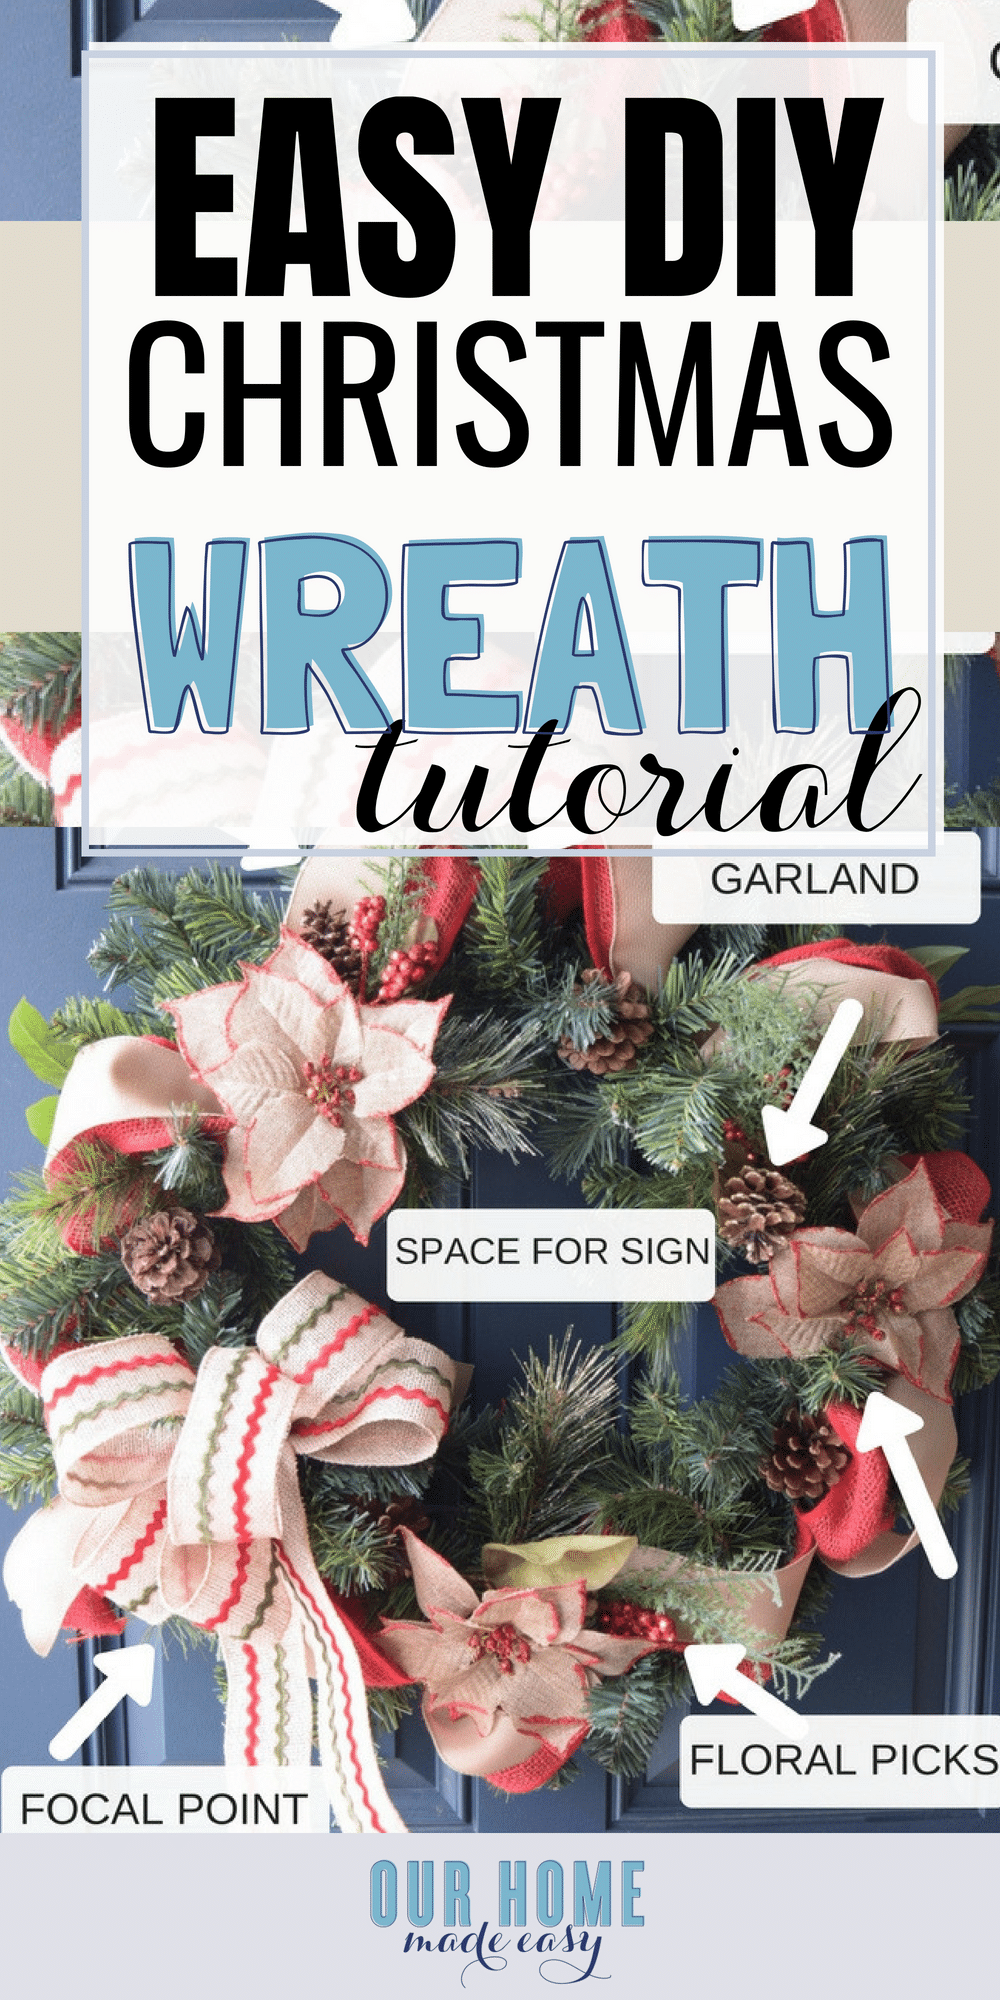
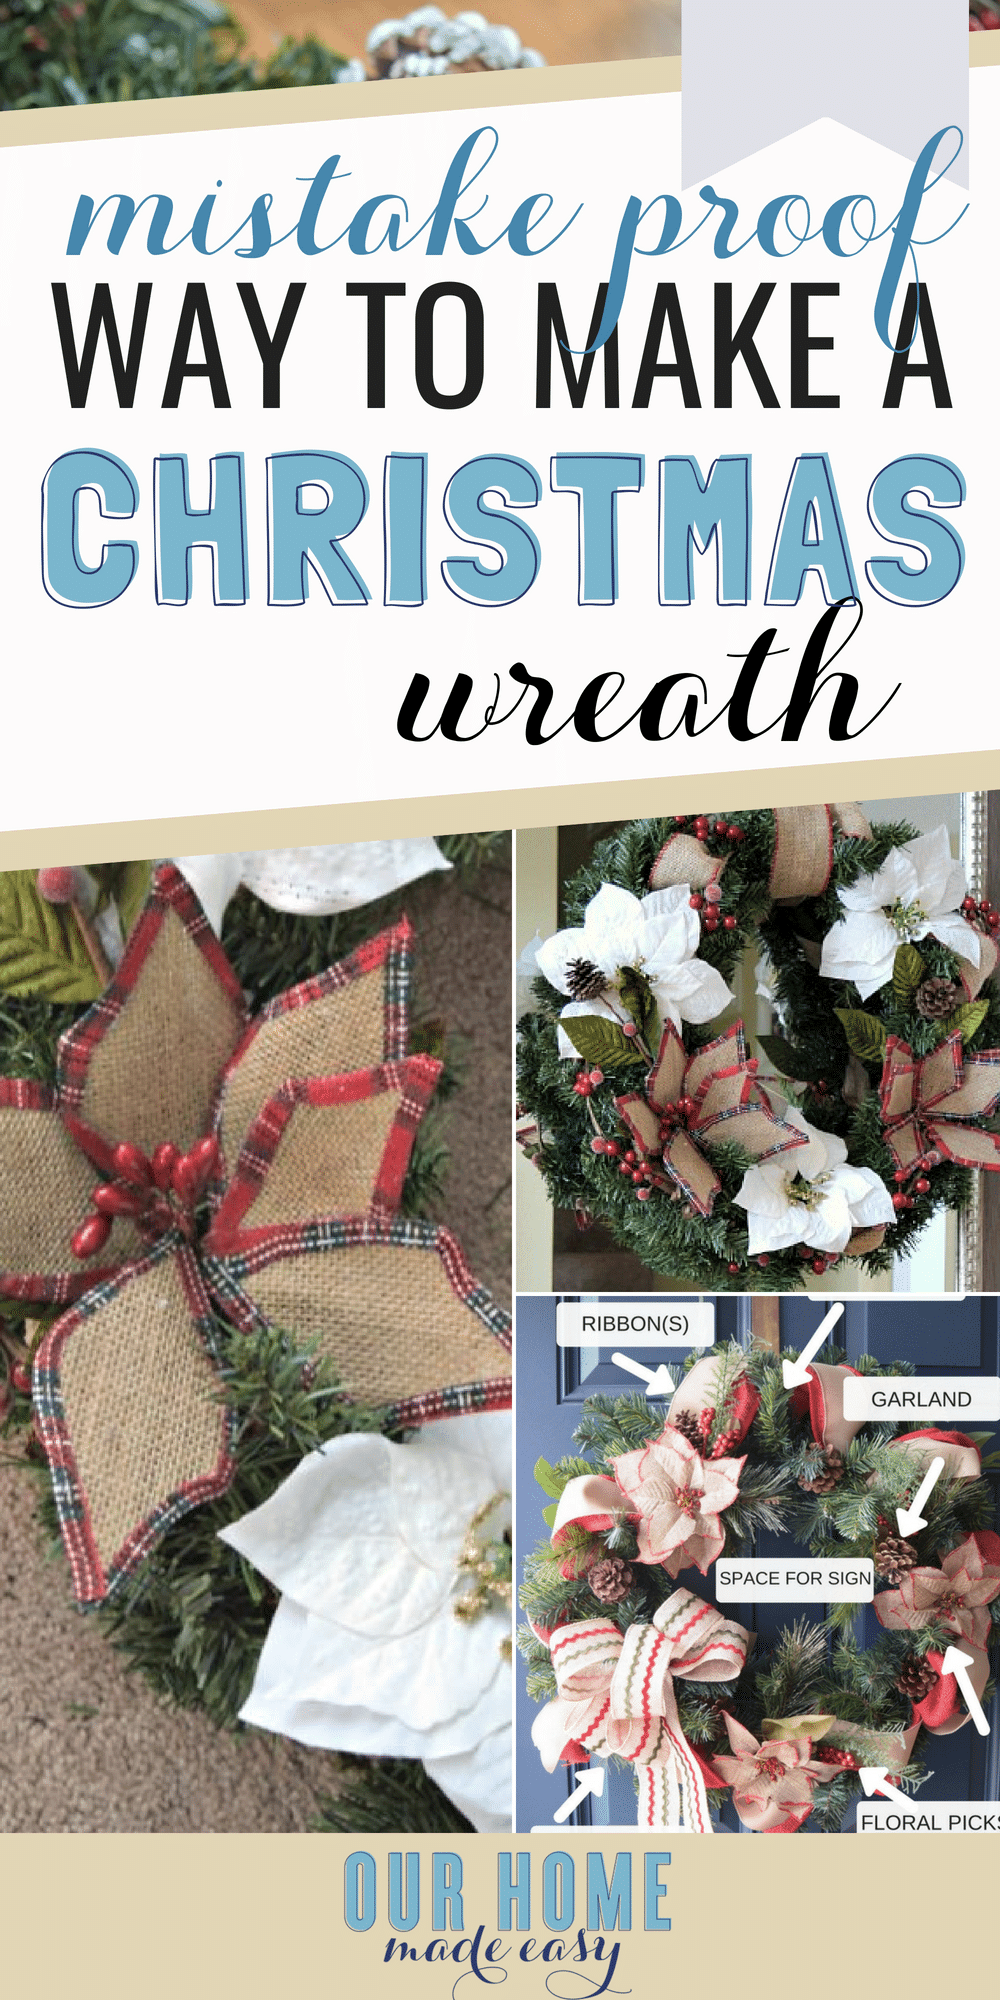
Once you have your ribbon and wreath in hand, pick one garland to accent your wreath. For my 24″ wreath, the 5′ berry garland from Michael’s worked perfectly. Since you have the wreath handy, you can quickly see what will work. Choose a garland that contrast again with the ribbon and wreath. Examples could be berries, pom-poms (if indoors) or if you’re making a grapevine wreath, consider picking up a thicker garland that has pine cones and greenery. To give you an idea of the options available, I’ve found a few at Michaels.com.
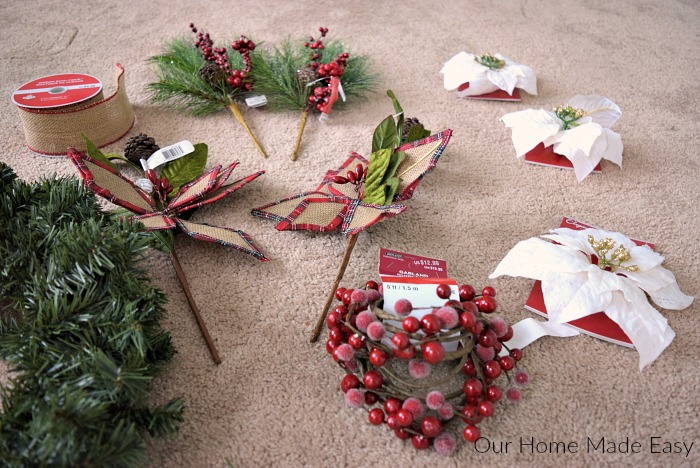
Choose Your Picks
Now the fun part! Take your shopping choices (and a cart!) over to the floral picks. Don’t be afraid to lay out your wreath and garland out. Then, pick out several picks in shapes and sizes to fit into your wreath. Ideally you’ll want to decide on multiples of no more than 3 picks that are in various textures and shapes. For my Christmas wreath, I have extremely large white poinsettia blooms, burlap flowers, and greenery with pine cones. The white poinsettia blooms were leftovers from my holiday shopping hoarding (see previous post) and needed to be consumed.
While the picks are relatively inexpensive, you may be drawn to larger, or more varied ones. Keep an eye on the cost. 3 or 4 of those premium ones can top $4-5 apiece!
Choose Your Main Pieces
Finally, and this is optional… Pick out a large bow for your wreath! I’d recommend the color coordinates with your overall scheme (it doesn’t need to match the ribbon) or choose a small sign that can be nestled into the wreath. Or do both, if you’re making a large wreath!
Don’t forget to pick up the wreath wire and a hook to hang up your wreath! I love suction cups and over the door hooks. Your choice.
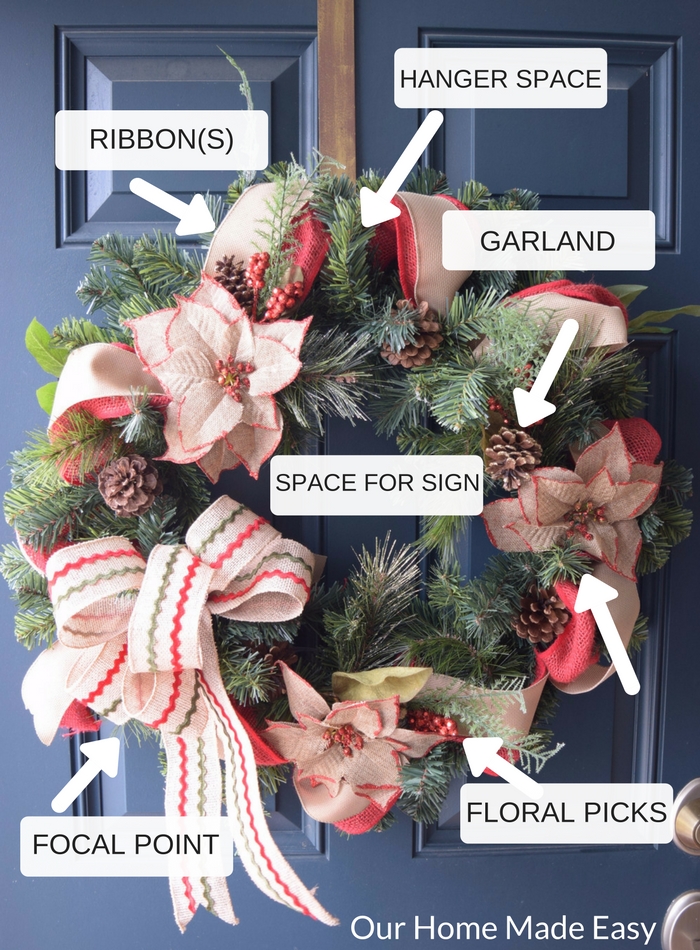
Assemble Your Wreath
Secure the Ribbon
Now, the really fun part! I’m going to show you to assemble the wreath so that you can remove everything in case your style changes or you find even better items next year.
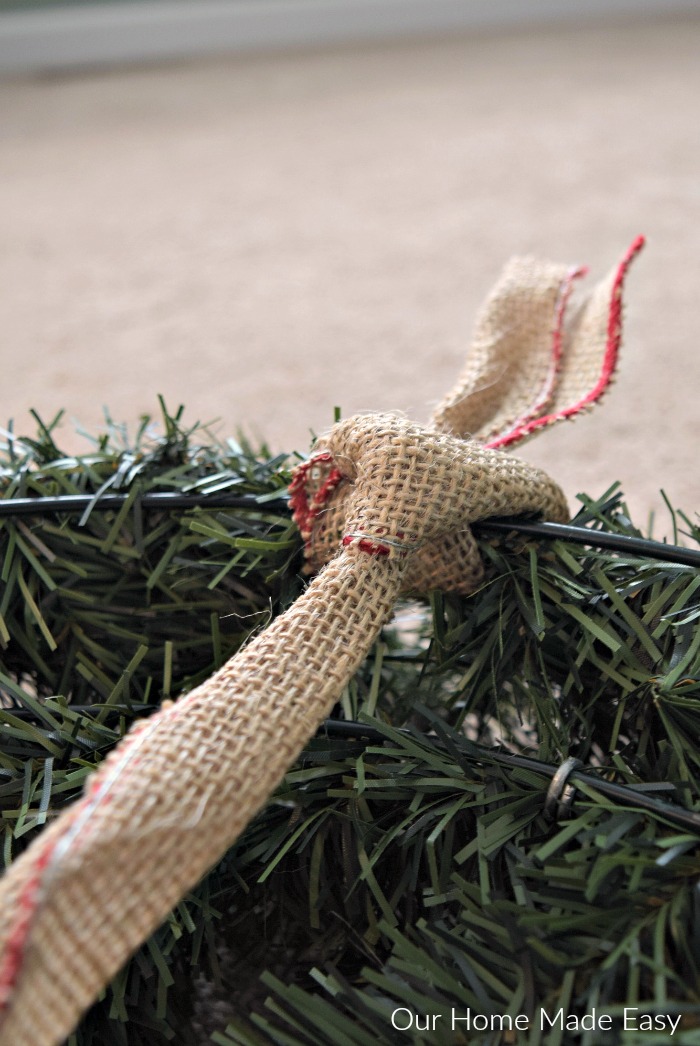
Take your ribbon and cut an extra generous length. I’d recommend going overboard and cutting a piece at least 6-7 feet long for a 24″ wreath. With the back side of the wreath facing you, knot the ribbon on one of the wires. For the grapevine wreaths, thread the ribbon through the wreath and thread again through a large portion of the wreath and knot. Now, you’ll weave your ribbon in and out of the wreath. Make it a “fluffy” or as a tight against the wreath as you’d like. As you weave it in and out, secure the ribbon by looping it around a wire along the back. This make sure the ribbon stays in place and doesn’t fall out place.
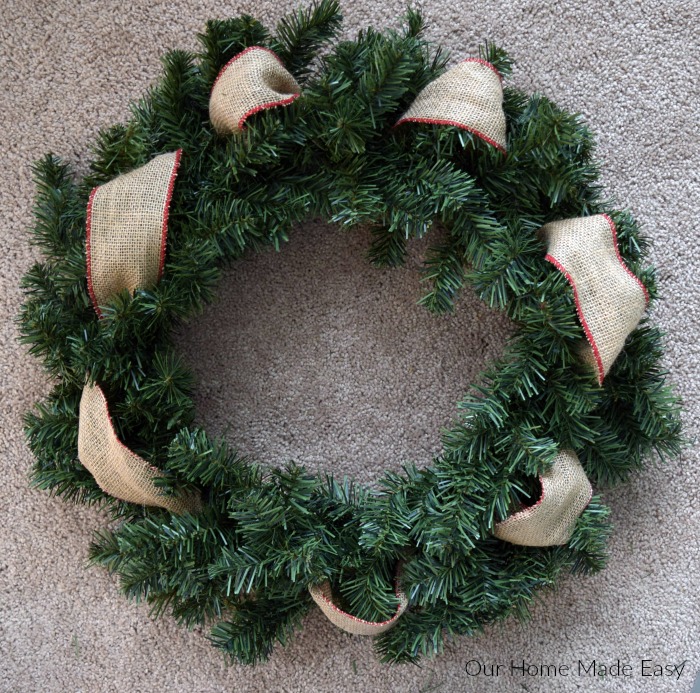
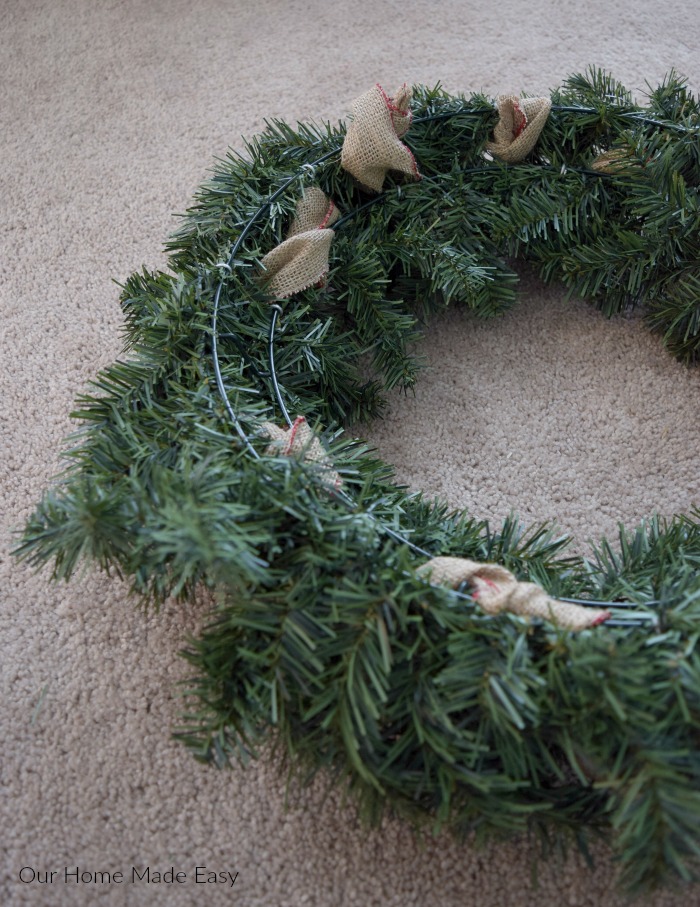
Secure the ribbon with a double knot when you’ve gone around the entire wreath. Cut the excess off the ribbon.
Add the Garland
With the wreath facing you, lightly position the garland around the wreath. For the berries, I tried to keep it around the perimeter so that they were visible and weren’t covered up by the picks. Naturally this is up to you and the width of your garland.
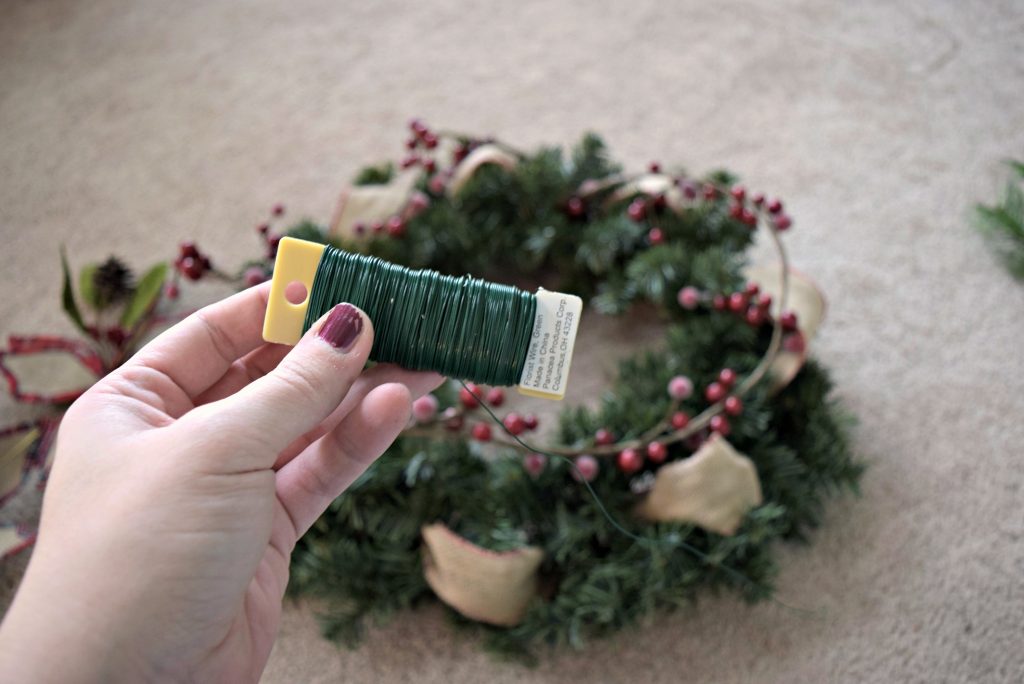
Once you have it loosely in place, secure the top of the garland with wreath wire. Cut an 8-10″ piece of wire with scissors and wrap it around the garland end and the wreath. Secure by knotting the wreath wire and garland end to the back frame of the wreath. Trim off any excess.
Repeat with the wreath wire by securing when ever the garland naturally touches the wreath. For my Christmas wreath, both ends are secured and two points within the garland are attached to the wreath.
Add the Picks
Quickly dry fit your picks in the order you’d like them. If you are adding a sign within the wreath, be sure to temporarily place it to see how much space you need.
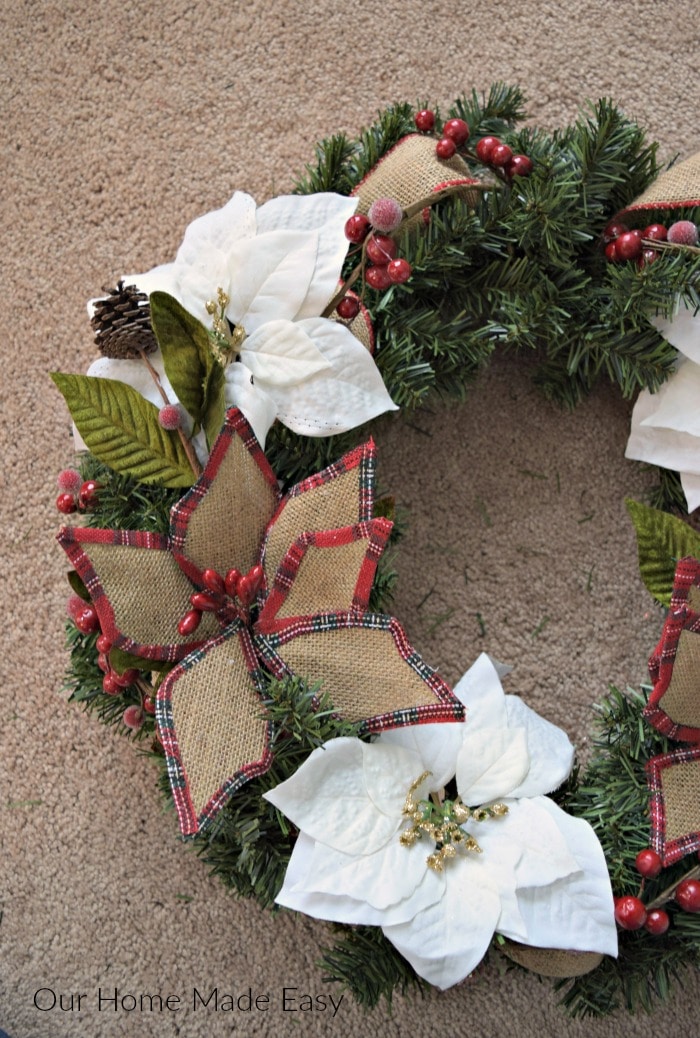
You may choose to keep your pick running in the same direction along the wreath, or they could be mirror facing and meeting in the middle sections. Whatever angle you insert them, keep it consistent through the entire wreath.
Trim the pick stems. If you can’t easy trim them, I like to bend them back. Same look, but gives the wreath wire more to “hold onto.”
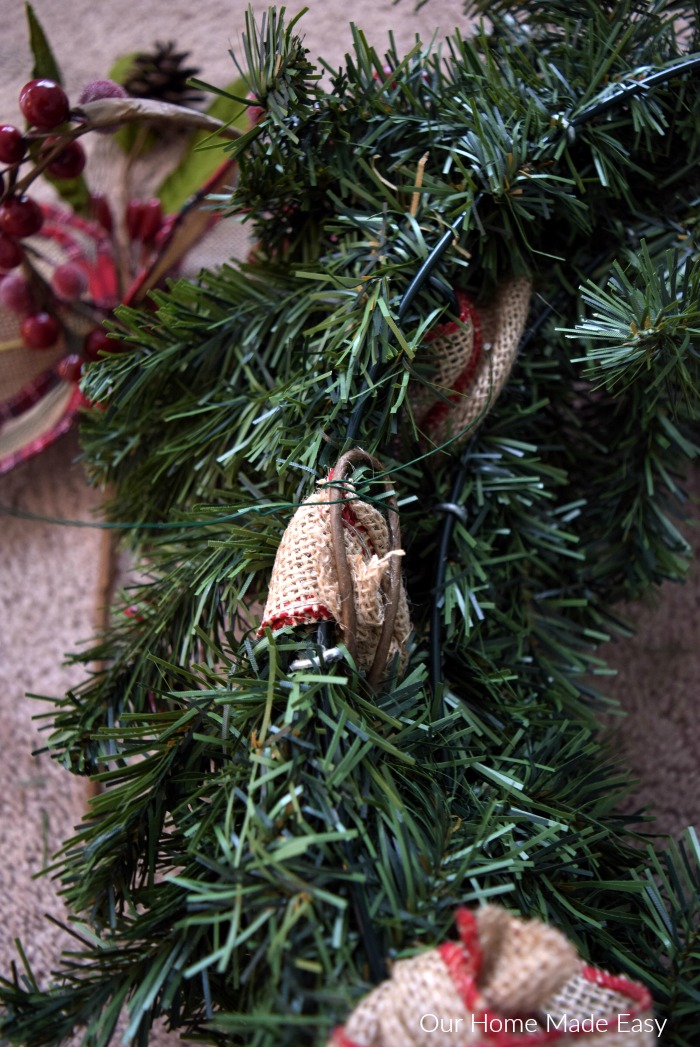
Like the garland, secure the picks to the wreath at locations where the pick naturally touches the base of the wreath. Trim off any excess wreath wire.
Add the Extras
Almost done! Add your large bow to your wreath using the wire. Or, if you want to add a small sign, attach it at this time.
Hang it
And finally….. it’s time to show off your masterpiece! Using either a suction hook or an over the door hanger, hang your artwork!
I hope you’ve found this helpful! If you want to add the burlap ribbon to the hanger, you can see how to do that [here]….
How to Make Your Own Pinterest Worthy Christmas Wreath!
Make your very own Pinterest-worthy Christmas wreath with this simple tutorial!
Materials
- Budget Wreath
- 1 style of Ribbon
- 1 Garland
- Decoration Picks
- Large Suction Cup or Over the Door Wreath Hanger
- Wreath Wire
- Optional: Large Bow or Accent Sign / Decor
Instructions
Measure Your Space
This is uneventful, but necessary. If I had listened to myself, I wouldn't have initially hung an 18" wreath on my mirror. It looked anemic in scale to the mirror. Measure your space to see size is best for you. For this mirror, I used a 24" green wreath. For the fall time, I also used 24" (duh, Brittany), so I should've kept that measurement going. To give you an idea, I used 15" wreaths on the mirrors in our dining room.
Standard sizes of wreaths are 15", 18, or 24". Pick which one will work best for you.
Find a Great Sale
Find a great sale at your local craft store and go nuts! Gather all the supplies you want to make your own wreath (burlap, red, plaid, ornaments, etc.). Almost everything you'll need for a wreath will fall under the floral category. While the picks you'll choose are relatively inexpensive, they add up quickly to the total cost!
Find a Surrogate Wreath
When you are in the store, you'll need to decide whether you want a green wreath, like the one I made, or a grapevine one. Grapevine is brown and rustic appearance. You may already have a wreath at home and that's great. You can still plan your project in the store.
Find a wreath in same size and carry it around the store with you as you plan. Don't forget to put it away at the end otherwise, you'll end with two wreaths needing styled. 😉
Now that you have a wreath in hand, you can begin planning in the store.
Pick a Ribbon
Your ribbon should be 2-3" in width. Think of the ribbon as being a supplemental texture to your wreath. I used a burlap base with red trim for my Christmas wreath. For my outdoor fall wreath, I used a fun lime green/white polka dot grosgrain ribbon. Both add dimension and aren't the focal point of the wreath.
Pick a Garland
Once you have your ribbon and wreath in hand, pick one garland to accent your wreath. For my 24" wreath, the 5' berry garland from Michael's worked perfectly. Since you have the wreath handy, you can quickly see what will work. Choose a garland that contrast again with the ribbon and wreath. Examples could be berries, pom-poms (if indoors) or if you're making a grapevine wreath, consider picking up a thicker garland that has pine cones and greenery. To give you an idea of the options available, I've found a few at Michaels.com.
Choose Your Picks
Now the fun part! Take your shopping choices (and a cart!) over to the floral picks. Don't be afraid to lay out your wreath and garland out. Then, pick out several picks in shapes and sizes to fit into your wreath. Ideally you'll want to decide on multiples of no more than 3 picks that are in various textures and shapes. For my Christmas wreath, I have extremely large white poinsettia blooms, burlap flowers, and greenery with pine cones.
While the picks are relatively inexpensive, you may be drawn to larger, or more varied ones. Keep an eye on the cost. 3 or 4 of those premium ones can top $4-5 apiece!
Choose Your Main Pieces
Finally, and this is optional... Pick out a large bow for your wreath! I'd recommend the color coordinates with your overall scheme (it doesn't need to match the ribbon) or choose a small sign that can be nestled into the wreath. Or do both, if you're making a large wreath!
Don't forget to pick up the wreath wire and a hook to hang up your wreath! I love suction cups and over the door hooks. Your choice.
Assemble Your Wreath
Secure the Ribbon
Take your ribbon and cut an extra generous length. I'd recommend going overboard and cutting a piece at least 6-7 feet long for a 24" wreath. With the back side of the wreath facing you, knot the ribbon on one of the wires. For the grapevine wreaths, thread the ribbon through the wreath and thread again through a large portion of the wreath and knot. Now, you'll weave your ribbon in and out of the wreath. Make it a "fluffy" or as a tight against the wreath as you'd like. As you weave it in and out, secure the ribbon by looping it around a wire along the back. This make sure the ribbon stays in place and doesn't fall out place.
Secure the ribbon with a double knot when you've gone around the entire wreath. Cut the excess off the ribbon.
Add the Garland
With the wreath facing you, lightly position the garland around the wreath. For the berries, I tried to keep it around the perimeter so that they were visible and weren't covered up by the picks. Naturally this is up to you and the width of your garland.
Once you have it loosely in place, secure the top of the garland with wreath wire. Cut an 8-10" piece of wire with scissors and wrap it around the garland end and the wreath. Secure by knotting the wreath wire and garland end to the back frame of the wreath. Trim off any excess.
Repeat with the wreath wire by securing when ever the garland naturally touches the wreath. For my Christmas wreath, both ends are secured and two points within the garland are attached to the wreath.
Add the Picks
Quickly dry fit your picks in the order you'd like them. If you are adding a sign within the wreath, be sure to temporarily place it to see how much space you need.
You may choose to keep your pick running in the same direction along the wreath, or they could be mirror facing and meeting in the middle sections. Whatever angle you insert them, keep it consistent through the entire wreath.
Trim the pick stems. If you can't easy trim them, I like to bend them back. Same look, but gives the wreath wire more to "hold onto."
Like the garland, secure the picks to the wreath at locations where the pick naturally touches the base of the wreath. Trim off any excess wreath wire.
Add the Extras
Almost done! Add your large bow to your wreath using the wire. Or, if you want to add a small sign, attach it at this time.
Hang it
And finally... it's time to show off your masterpiece! Using either a suction hook or an over the door hanger, hang your artwork!
Other Christmas Posts
A Simple Christmas Bedroom | How to Keep Your Weeknights Simple During the Holidays |
13 Favorite Places to Buy Holiday Decor on the Cheap! | Our Christmas Tree | 34+ Christmas Décor Items that Fit Your Budget!
Get Your Free Holiday Organizer Today!
Pin for later:
Great piece – and great wreath! Very pretty.
Thanks, Maggie! -Brit