DIY Christmas Gnome Ornaments (No Sew, Craft Party Idea)
These cute no-sew DIY gnome ornaments are easy to make and great for your next holiday craft night!
(This post contains affiliate links. Please see my Disclaimer for more information.)
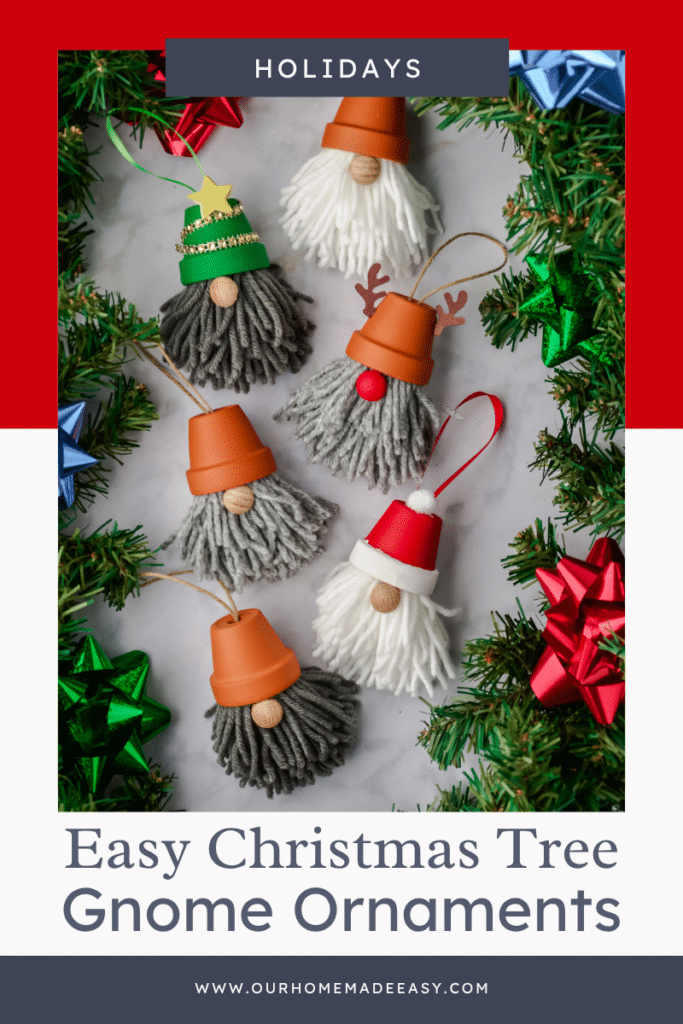
Looking for the cutest craft to kick off the Christmas season? These DIY gnome ornaments are a festive, no-sew craft you can pull together with simple supplies and a little creativity.
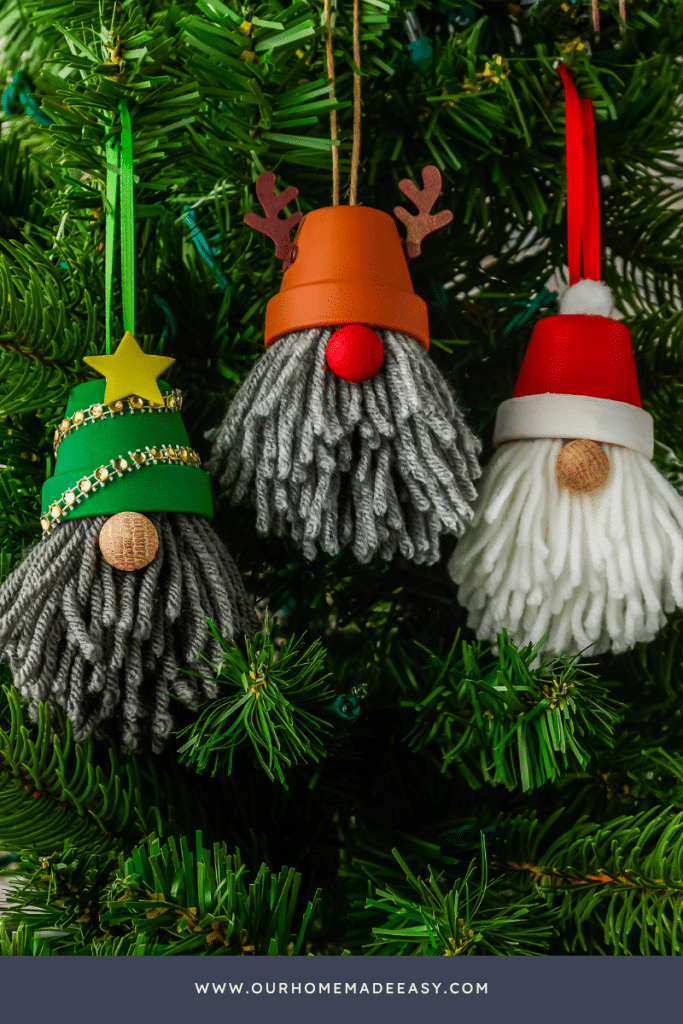
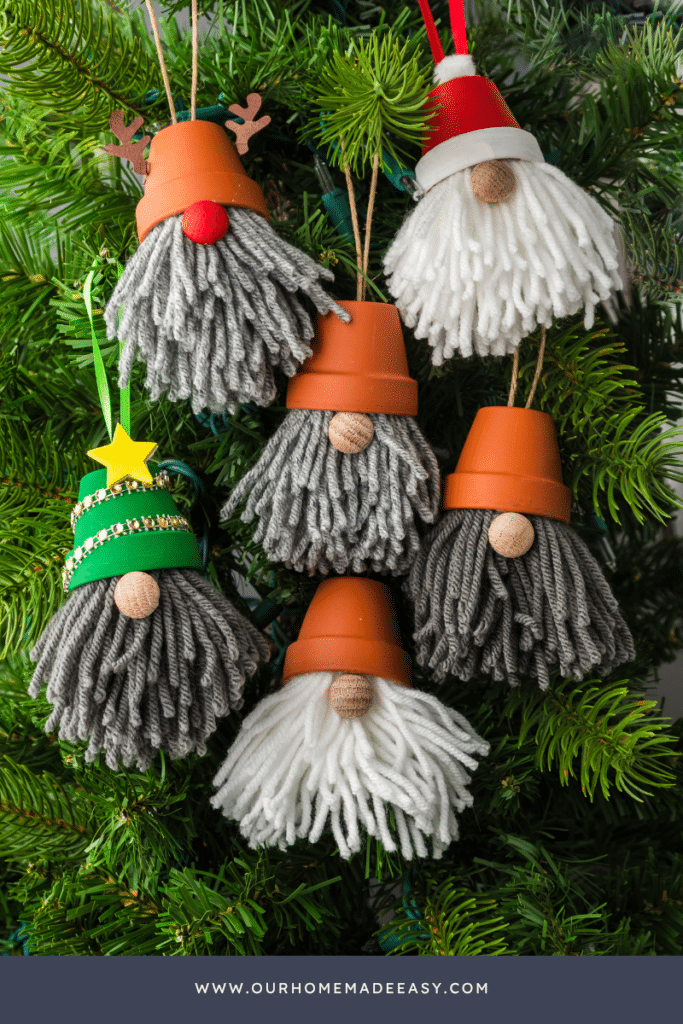
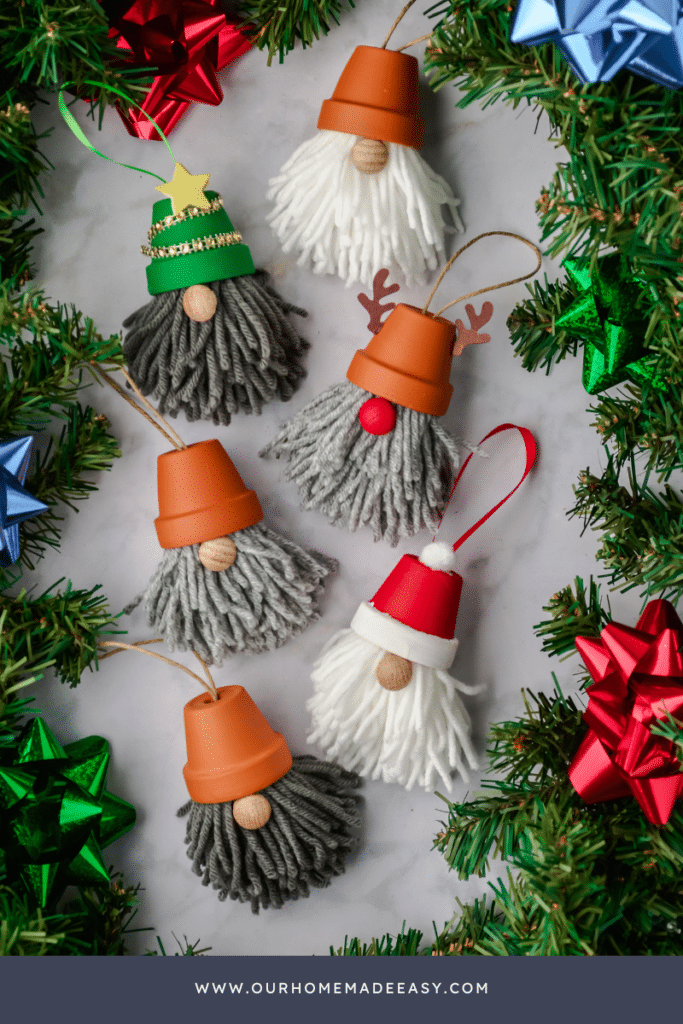
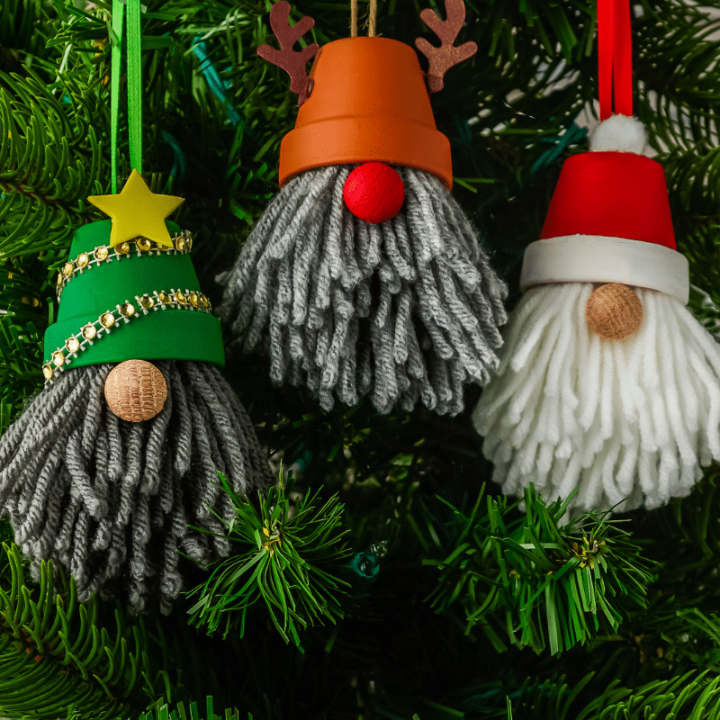
With three tutorial styles—Santa hat gnome, reindeer gnome, and Christmas tree gnome—there’s a version everyone will love!
What You’ll Love About This DIY Gnome Ornaments Craft:
What Makes the Gnome Ornaments So Fun?
You don’t need a full day or fancy supplies—just a little time, a glue gun, and some mini pom-poms. Whether it’s a Friday night with your closest girlfriends, a holiday movie playing in the background, or the kids upstairs giggling while you craft, these DIY gnome ornaments make the season feel more joyful and less stressful.
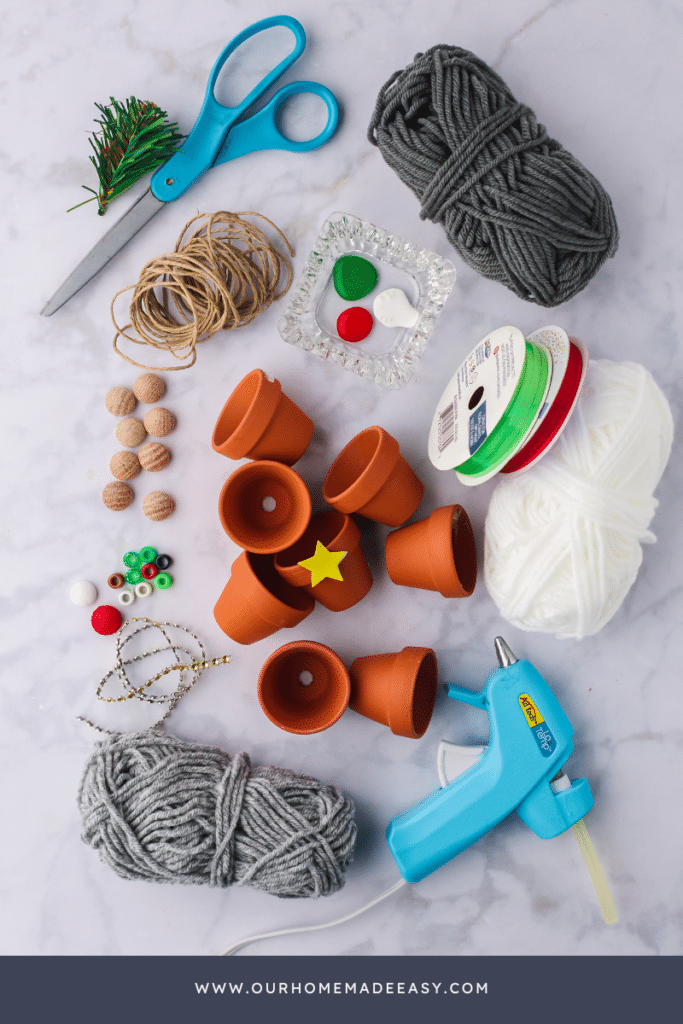
Supplies Needed
Shop this post

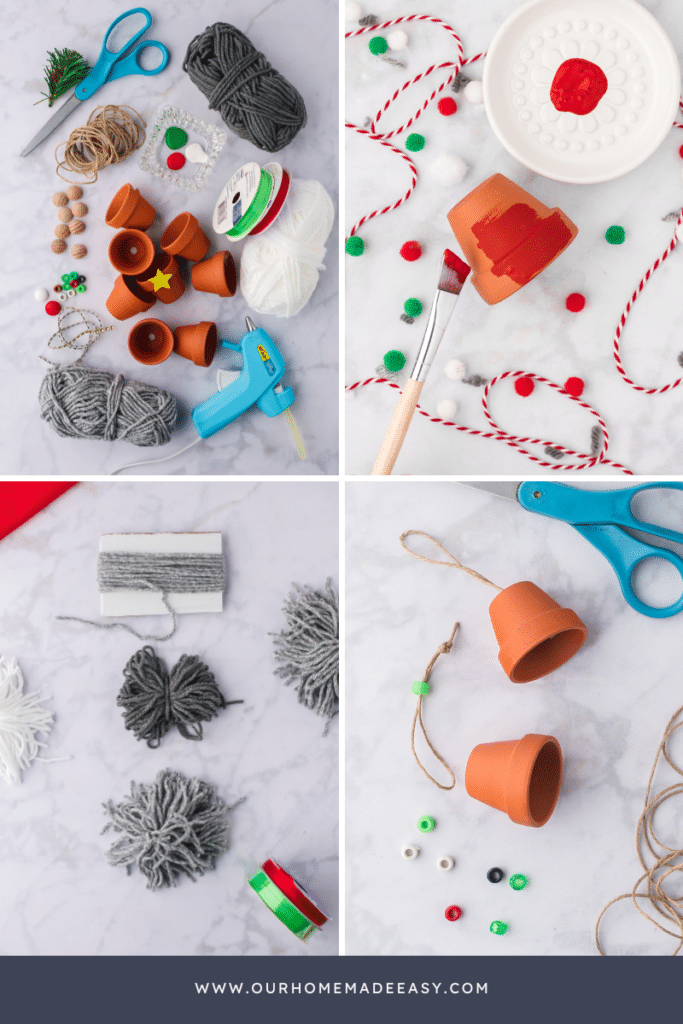
Step 1: Paint the Pots
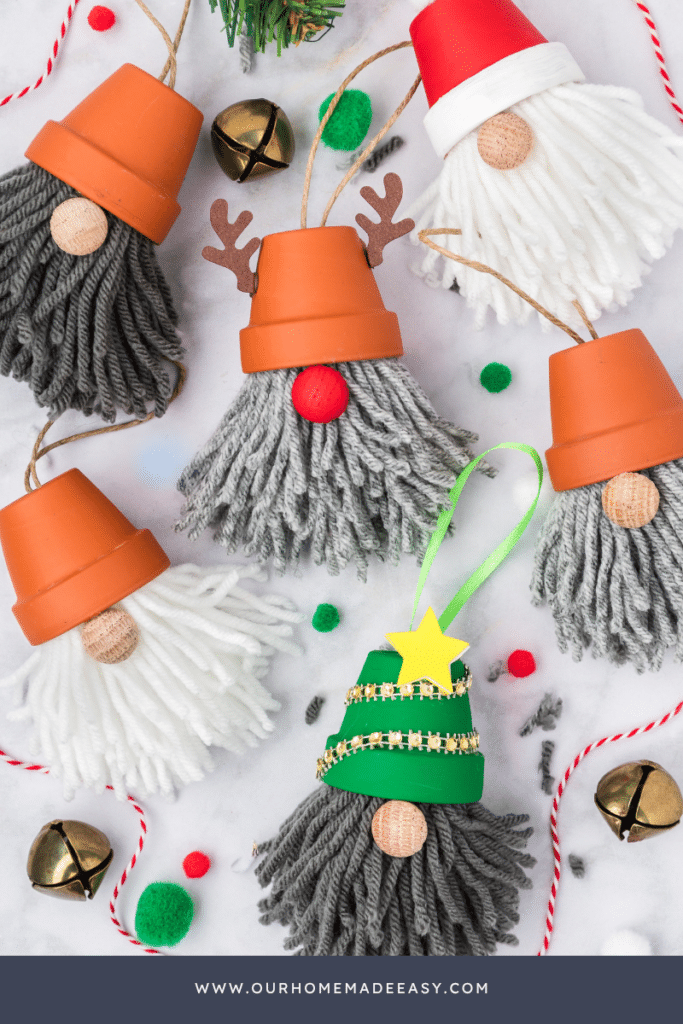
Paint one clay pot red with a white bottom rim for your Santa gnome. Paint another green for your Christmas tree. Leave one clay pot unpainted for your reindeer. Paint one wooden bead red for Rudolph’s nose.
Step 2: Make the Yarn Beard
Wrap your yarn around four fingers or a small piece of cardboard 50 to 75 times. Slide it off and tie the middle with another piece of yarn. Cut the loops on each side to make a pom pom-style beard.
Step 3: Create the Hanger
Cut a 7-inch piece of ribbon or twine and run it through a pony bead, then tie a knot. Push the bead up into the pot through the bottom hole—this becomes your ornament hanger.
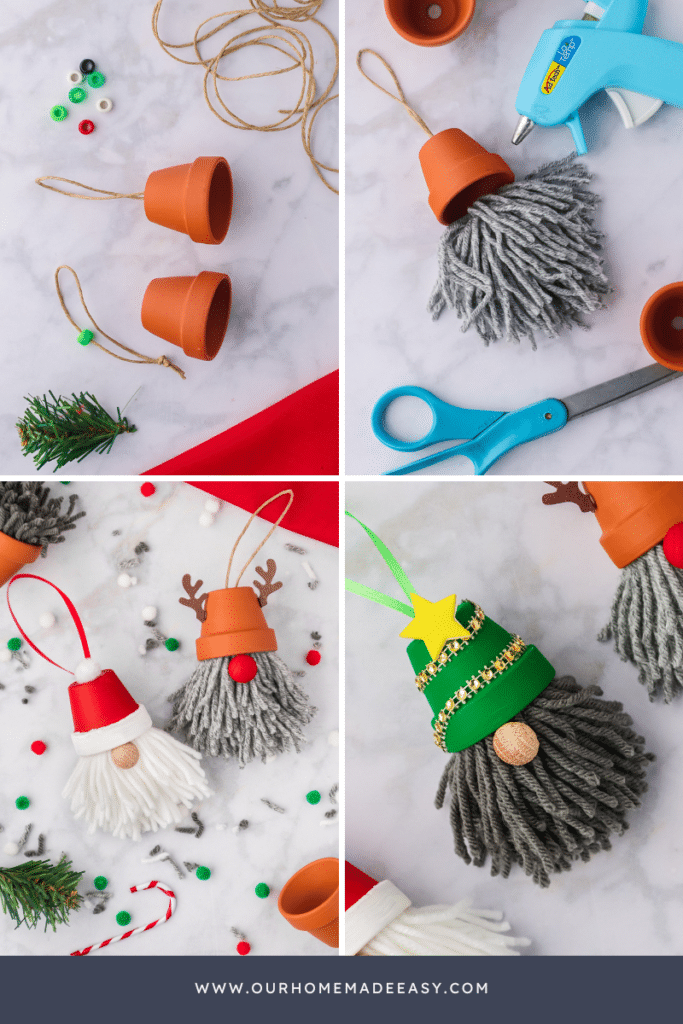
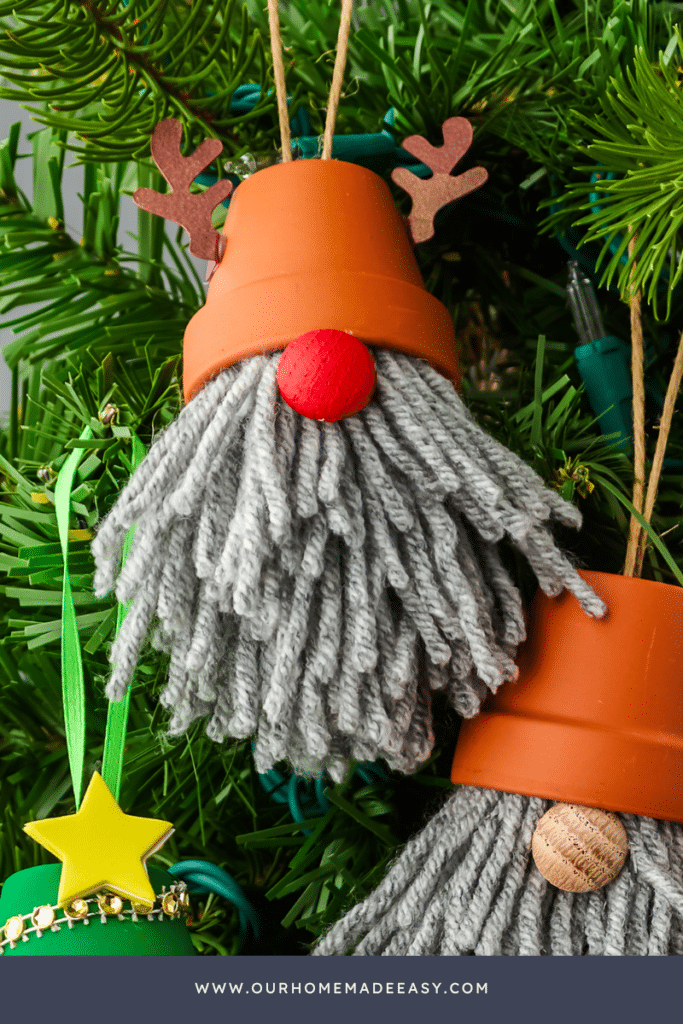
Step 4: Make Reindeer Antlers
Trace and cut out antlers from brown cardstock. You can use a stencil or freehand them—just make sure they’re symmetrical.
Step 5: Attach the Beard
Once your pot is dry, run a bead of hot glue along the bottom edge. Press in the yarn pom pom and trim it into a tidy beard shape.
Step 6: Build Your Gnomes
Add your wooden nose right above the beard line with hot glue. Decorate as follows:
- Santa Gnome: Add a white pom pom to the top of the hat.
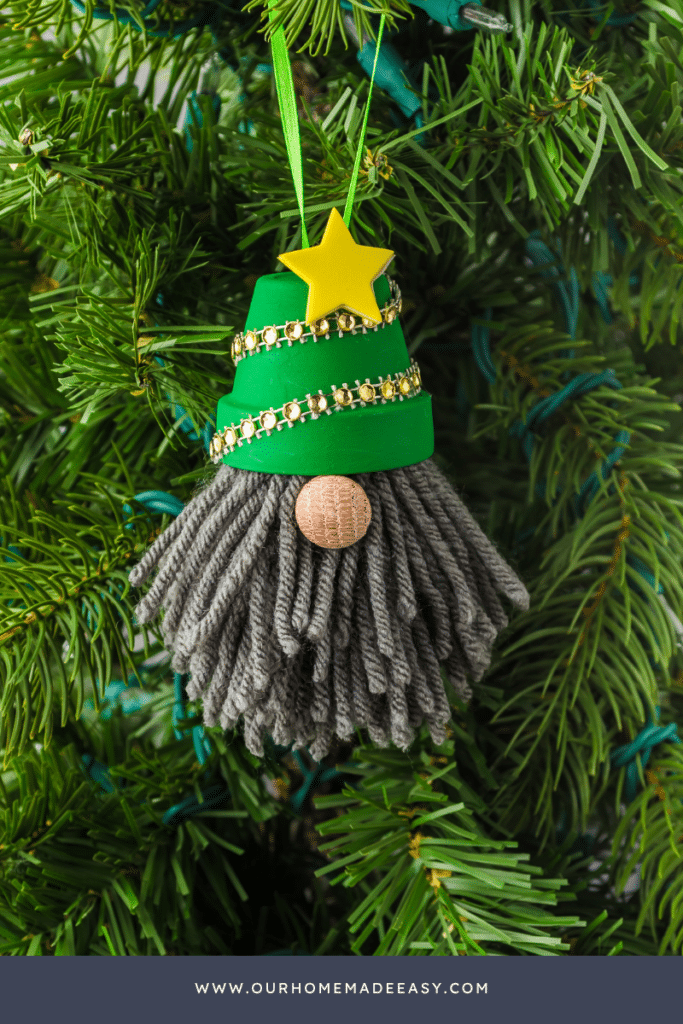
- Christmas Tree Gnome: Wrap the pot with a small strand of tinsel and glue a star to the top.
- Reindeer Gnome: Glue the antlers to the sides and a red nose to the front.
For even more cute crafts, you will like these:
Customize It for Any Season
Don’t feel limited to just Christmas. Try these other themed ideas using the same steps:
- Spring Gnomes: Use pastel painted clay pots and flower embellishments.
- Patriotic Gnomes: Red, white, and blue paint with star stickers.
- Winter Woodland: Skip the paint and go full rustic with faux fur, wood beads, and twine. I do have this one in the photo above.
You can find all the supplies you need at Amazon, Wal-Mart, Dollar Tree, or Michaels. Be sure to check your craft stash first—this is a great opportunity to use what you already have stuffed away in craft drawers!
Pro Tips for Hosting a Craft Night
- Prep the pots and beards ahead of time so guests can focus on decorating.
- Print a few sample photos for inspiration (or use this blog post!).
- Cover the table with brown kraft paper for easy cleanup.
- Encourage guests to bring extra craft bits—everyone shares, and everyone wins.
- Hot glue guns are a must—bring backups and extra glue sticks.
If the holiday season has you feeling rushed, this craft is the perfect excuse to slow down and make time for what matters—connection and creativity.
Plan that craft night, pour the wine, and let yourself enjoy the fun of the holidays, one gnome at a time.
DIY Gnome Ornaments
These adorable ornaments can be dressed up for the holiday season or left out all year round! Use mini clay pots and yarn for one of the cutest gnome decorations ever!
Materials
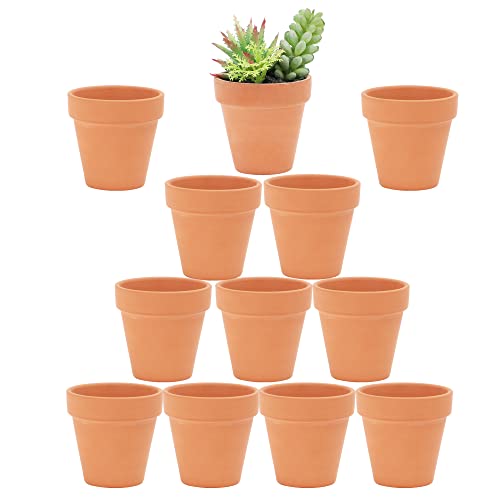
- 3 Mini Clay Pots (2 ½ inch Diameter)
- Craft Paint (Red, Green, and White)
- Chunky Yarn (Beard Colors – White, Brown, Gray, or Black will work)
- Wood Buttons or Balls (for Noses) These can be found at Amazon or craft stores.
- Brown Cardstock (for Antlers)
- Ribbon or Twine (I Used Red and Green Ribbon and Also Twine)
- Pony Beads (You Can Also Use Buttons or Bells)
- Star Decoration (I Used a Foam Star)
- Small, White Pom Pom for the top of a Santa hat (or Something Similar)
- Holiday Decorations (E.g., a craft ribbon, pom poms, evergreen picks, etc.)
Tools
- Scissors
- Small Paintbrush
- Glue Gun
- Glue Stick
Instructions
- PAINT THE HATS
Paint the clay pots
Clay pot #1 – paint the pot red and the bottom edge white (for Santa hat)
Clay pot #2 – paint green (for Christmas tree)
Clay pot #3 – no paint (this pot will be the reindeer)
Paint one of the wood buttons or balls red, for Rudolph’s nose - YARN BEARDS
Wind yarn around four fingers or a 4-inch piece of cardboard. Depending on the thickness of the yarn, wind it about 50 times. If you are not using chunky/thick yarn, you might want to wind it closer to 75 times for a full beard.
Slide the yarn off and tie in the middle with an extra piece of the same yarn.
Cut the loops of yarn to create a pom pom. - CREATE THE HANGER
Cut a 7-inch piece of twine or ribbon and run it through the pony bead (bell or button). Tie a knot at the end.
Push the ribbon inside the clay pot through the hole, leaving the pony bead inside to create a hanger. - RUDOLPH’S ANTLERS
Cut the antlers out of brown card stock. (I found a picture of antlers that I liked on Google, printed it, and traced it before cutting it out.) - ATTACH THE BEARD
Hold the pom pom by the string you tied in the middle, and make sure all the ends are pointing down.
Once the paint has dried, make sure the hanger is in place. Then, run a bead of glue along the edge of the clay pot and push the yarn pom pom inside.
Trim the beard so it is even at the bottom, and continue trimming and shaping the sides to create a beard shape. (refer to pictures) - PUTTING IT TOGETHER
Glue a wooden nose to the yarn and the bottom edge of the clay pot. Remember to glue the red nose to the unpainted clay pot for Rudolph.
*For the Santa hat, glue a white pom pom to the top.
*For the Christmas tree, wind the decoration around as the garland and then glue a star to the top.
*For Rudolph, glue the antlers to either side of the clay pot.
Notes
To enjoy these ornaments year-round, don’t paint the clay pots. Use twine for the hangers for a rustic feel or add your decorations. They are cute any time of the year!
For extra stability, the pony bead (or bell) can be glued to the inside of the clay pot.
Recommended Products
As an Amazon Associate and member of other affiliate programs, I earn from qualifying purchases.


Did you make this Craft?
Mention us @ourhomemadeeasy or tag us using #ourhomemadeeasy so we can see your project! You can also leave a comment below!

Hi, I’m Brittany, and I believe life at home should feel easier, not heavier.
I’m the creator of Our Home Made Easy, a space for busy women who want dinner on the table, their homes running smoothly, and a little breathing room at the end of the day.
You won’t find perfection here, just realistic recipes, smart shortcuts, and simple routines that work in real life. The kind that help you feed your family well, stay organized enough, and still have time to actually enjoy it.
If you’re juggling work, kids, schedules, and everything in between, you’re in the right place. I’m so glad you’re here.


