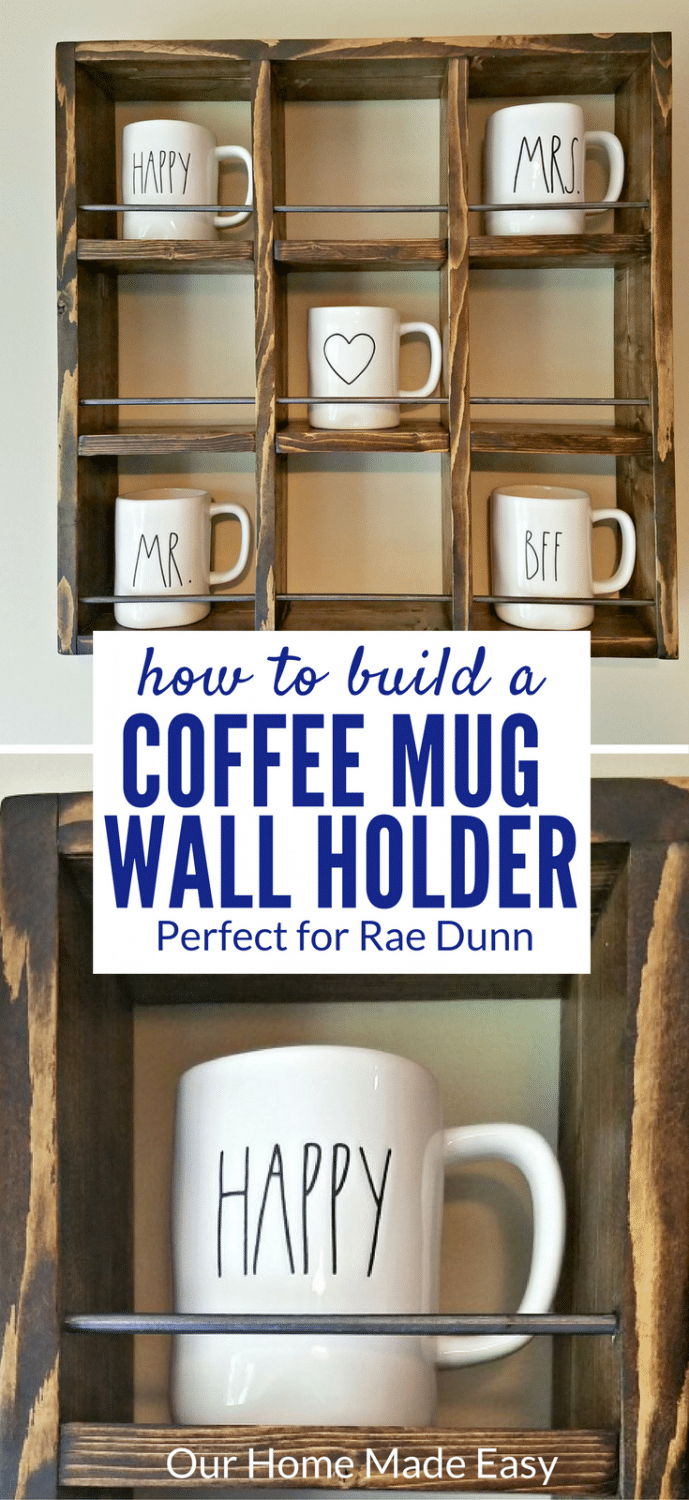
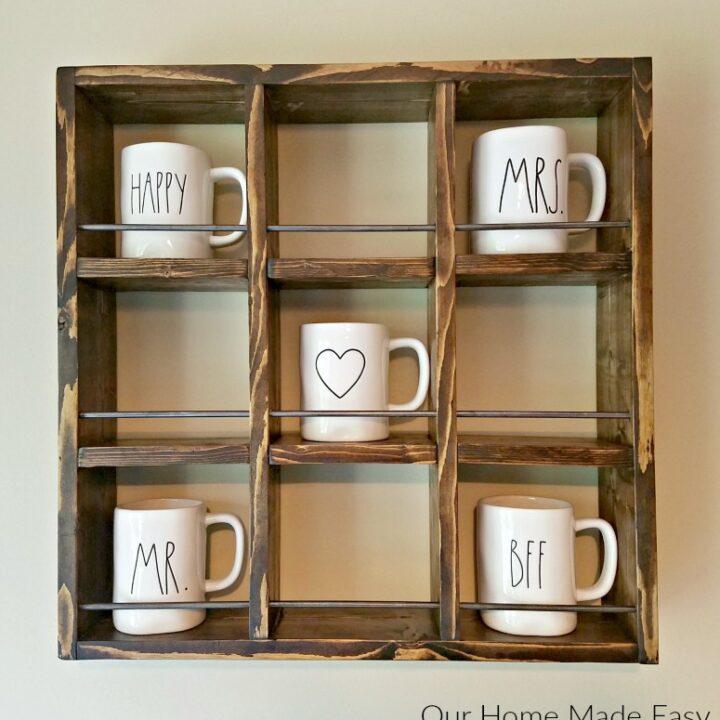
How to Build a Rae Dunn Mug Holder for Cheap!
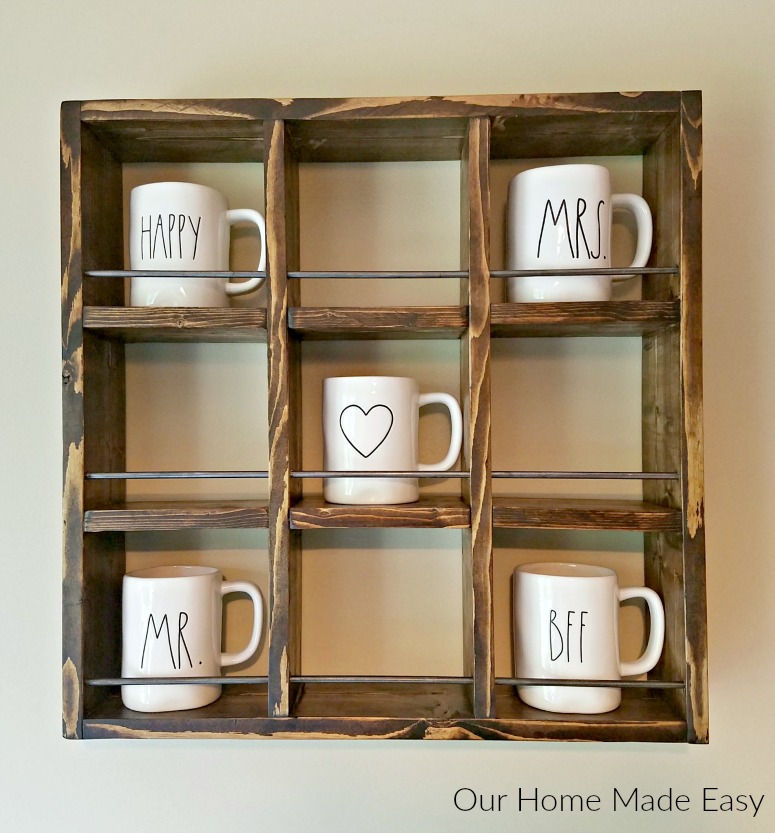
It was no surprise when my sister, who visits her local Home Goods more than she cares to admit, asked Jordan if he’d consider building her a coffee mug holder to store her collection (and free up counter space for more 😉 ). Jordan built this holder in an afternoon and I’m even considering starting a collection…..
(This post contains affiliate links. If you shop from my blog, I may be compensated for clicks or purchases that you make. Read my disclaimer page for more information.)
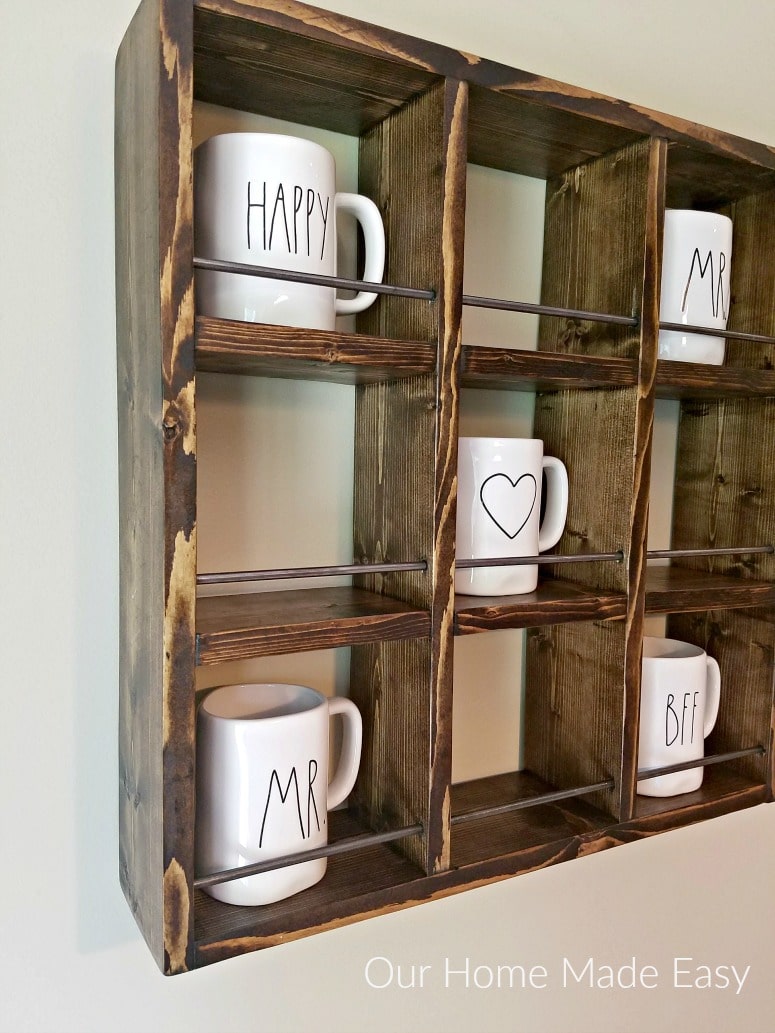
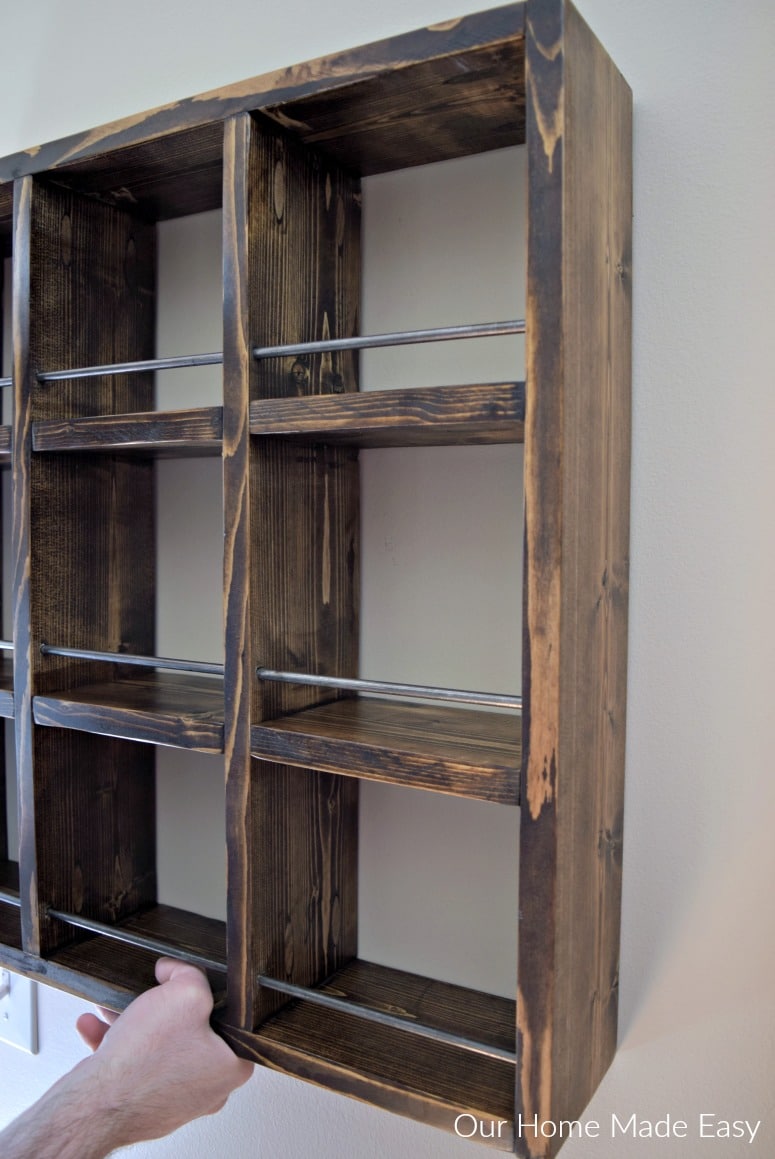
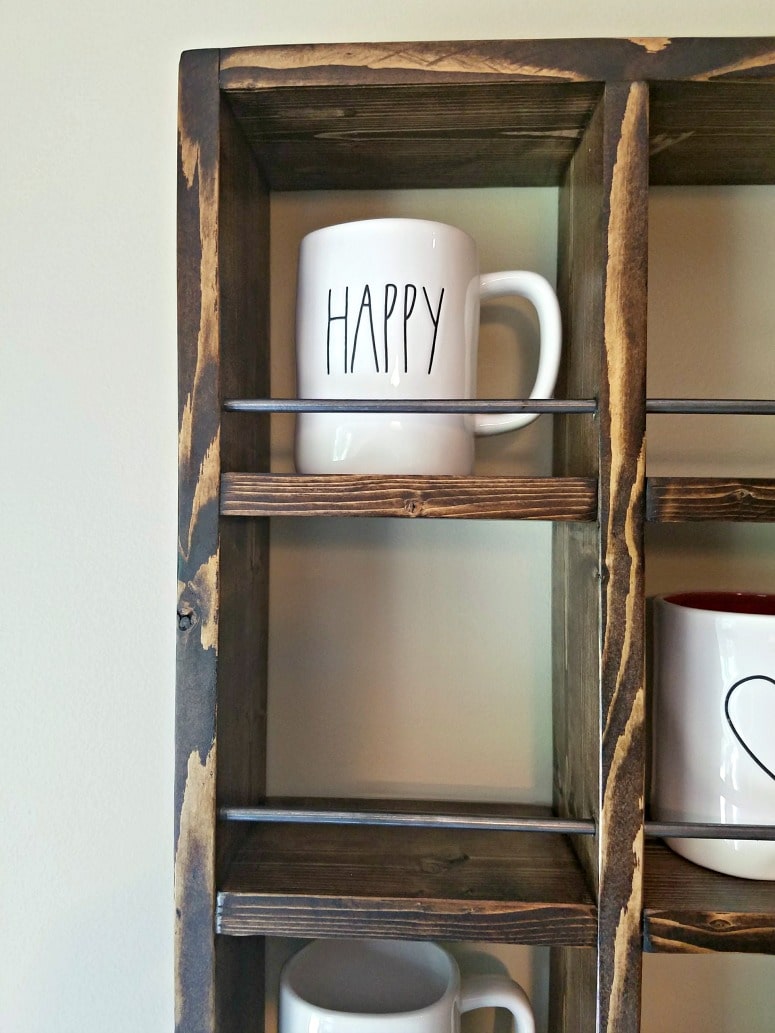
Isn’t this adorable? Jordan added the metal rod to add some rustic-industrial character and make sure that one of Cady’s mugs wouldn’t accidentally tumble out. She has an active toddler, too. 🙂
You’ll see that the Kreg Jig is central to assembling this holder. If you don’t have a Kreg Jig, I cannot recommend it enough! It’s perfect for weekend DIY-ers who want to create their woodworking projects, but don’t need to spend a lot of money.
Supplies Needed For Making Rae Dunn Mug Holder
- 2- 1″ x 6″ x 8′ Pine Boards
- 1/4″ x 6′ Metal Rod
- 2- Keyhole Hangers
- Table Saw
- Miter Saw
- 5/8″ Forstner Bit (for hanging)
- Chisel (for hanging)
- Kreg Jig
- Paintable Kreg Plugs
- Orbital Sander & Pads
- Stain (used my ol’ favorite)
- Polycrylic (I used this sheen)
Prep Your Boards
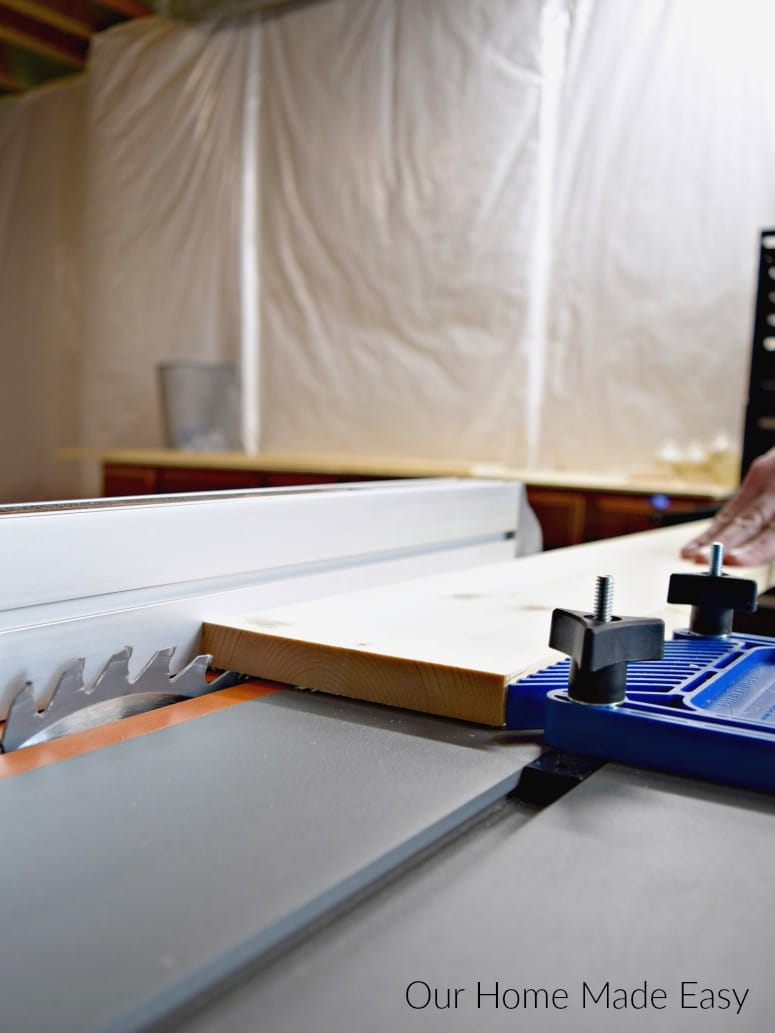
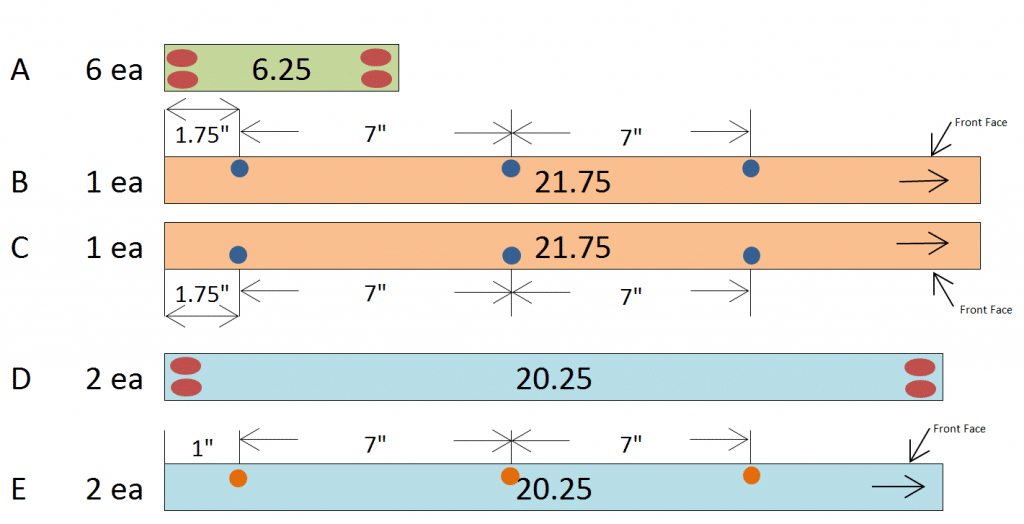
Using the diagram below, cut your 1″x 6″x 8′ boards. You won’t want the mug holder to be the full 5.5″ deep, so you’ll need to rip it down to 4.5.”

Then, you’ll want to mark your drill holes 1″ above each level, 3/8″ from the edge of the front of the board. Drill your rod holes using a 5/16″ bit. You will drill through the entire board for the inner 2 boards. For the outer boards, only drill 1/2 through (you don’t want to see any holes on the outer sides).
Once your boards are drilled, you’ll want to measure the keyhole hanger, about 3″ from the top of the board. Since the forstner bit is 5/8″, it’s important to very carefully drill into the wood, as it’s only about 3/4″ wide! Use the bit to remove the wood from the top and bottom for the hanger. Use a small chisel to remove some wood in between.
Optional: You can install your keyhole hangers now, or wait until you’re finished.
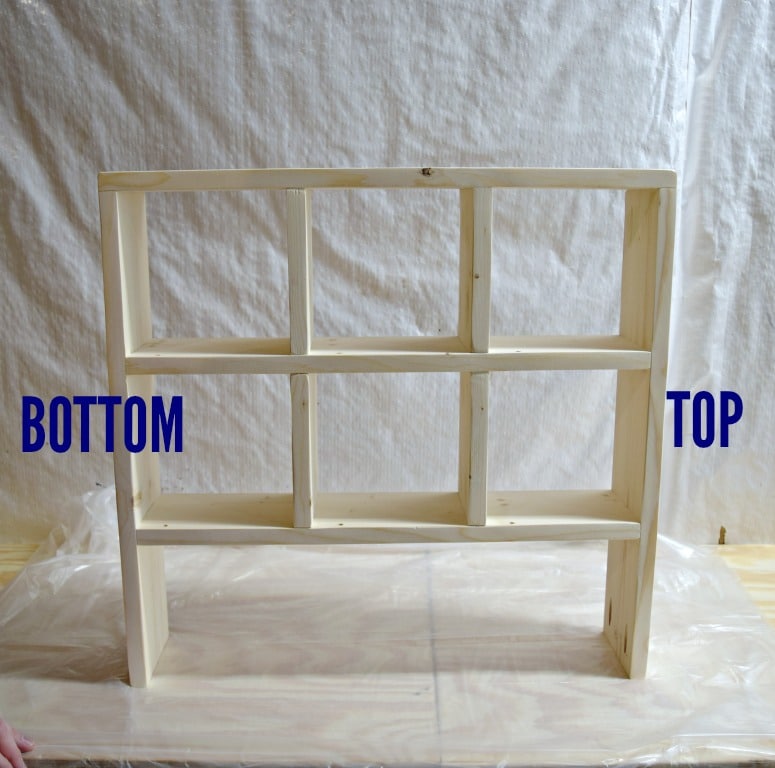
Dry fit your boards to make sure they look straight!
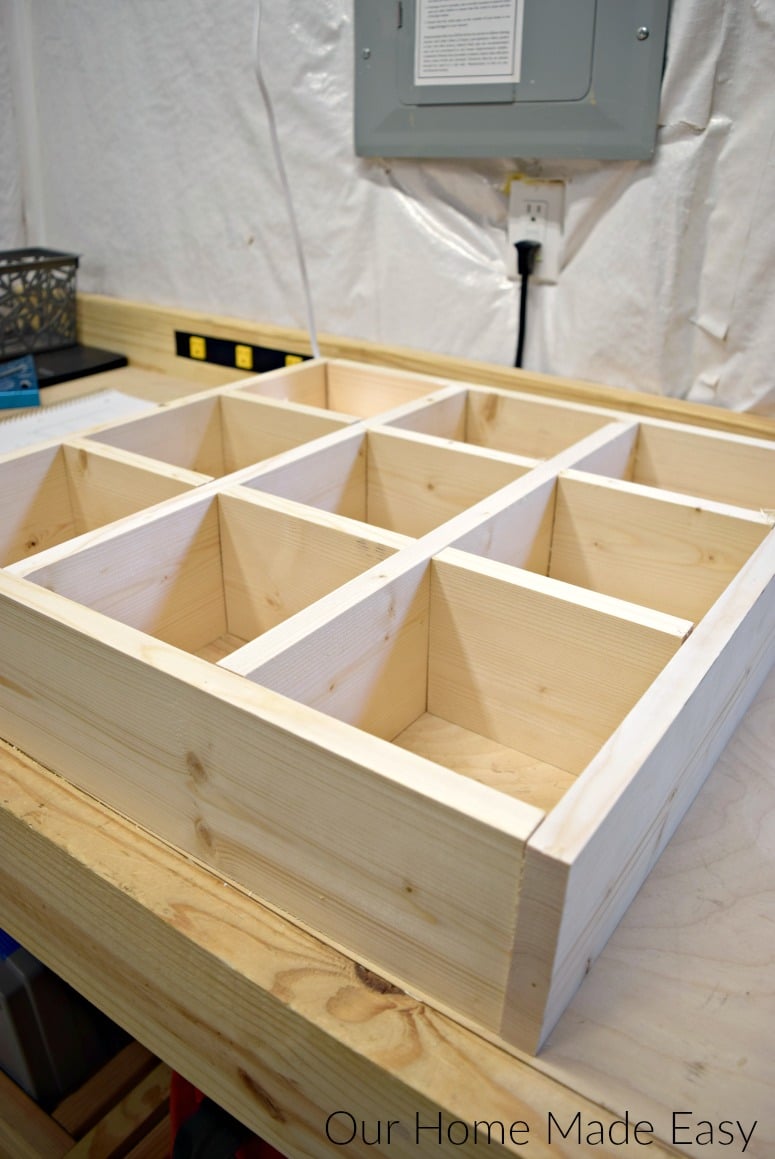
Start Joining Your Boards
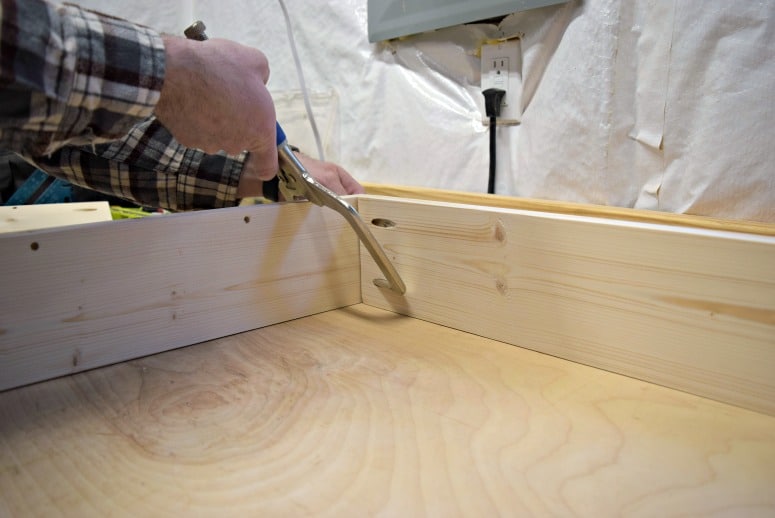
Next you will want to start joining your boards! To make it easier, use a right angle clamp. Your pocket holes should always be on the bottom of each level so that when you are looking at it (and empty of mugs), you don’t see any pocket holes. Always down.
Jordan created these diagrams to help you fit the pieces together.
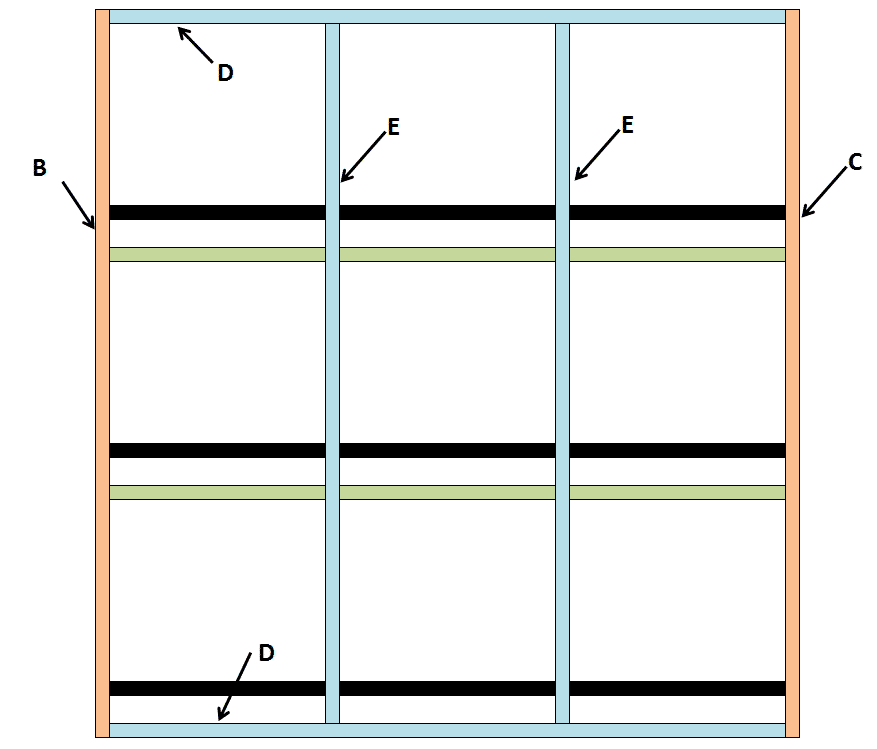
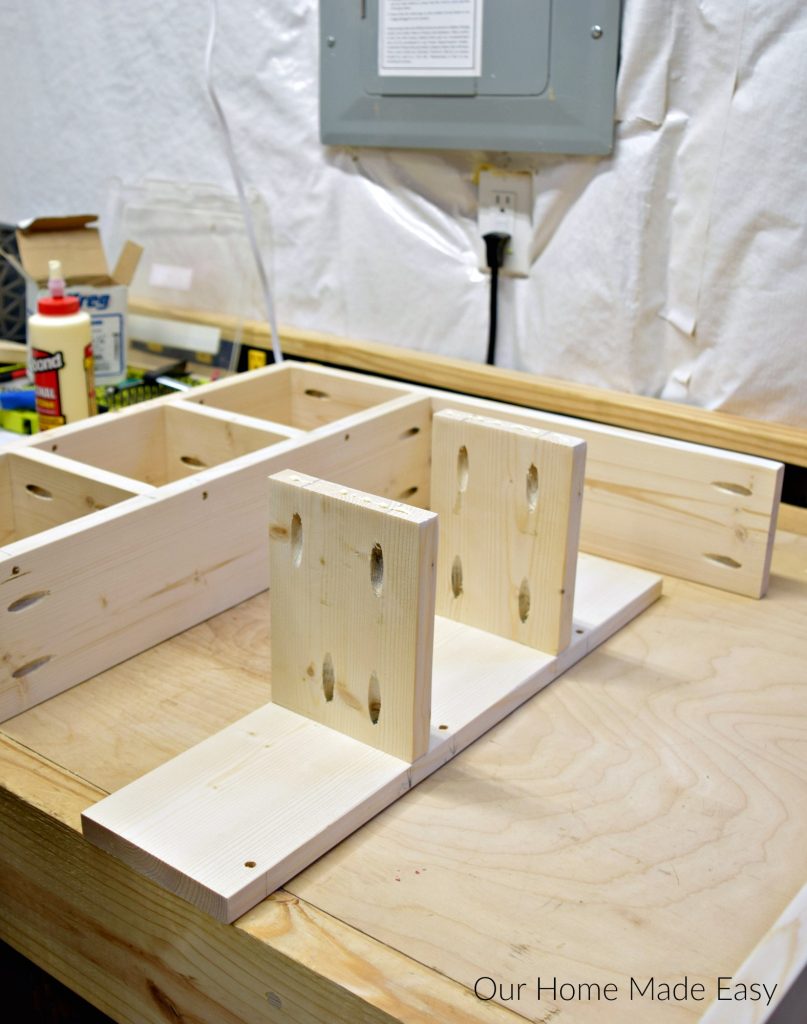
You can see that it’s easier to assemble in inner sections once your outer box is joined.
DO NOT Complete the assembly until you read the next step about installing the metal rod!
To make it as easy as possible, fill in your Kreg plugs and sand them down prior to installing the metal rod. This leaves you with the most room to move around and sand the plugs.
Install the Metal Rod
As you’ll piece it together, you’ll end up with one open side. This is where you’ll install the metal rod. Cut the rod to 21″ for each level.
Simply thread it through the holes and finish the assembly by joining the remaining exterior piece.
Finish the Mug Holder!
 Once your mug holder is assembled, lightly sand it down along the edges using an orbital sander.
Then, stain it and apply a sealer. We always choose our go-to stain color and sheen.
Lastly, drill in your keyhole hangers if you didn’t do it in the first few steps!
How to Build a DIY Rae Dunn Coffee Mug Holder for Cheap!
Create your own DIY version of this Rae Dunn coffee mug holder for your home! It's a simple DIY project that's much cheaper than the original, and looks just as great in your home!
Materials
- 2- 1" x 6" x 8' Pine Boards
- 1/4" x 6' Metal Rod
- 2- Keyhole Hangers
- Table Saw
- Miter Saw
- 5/8" Forstner Bit (for hanging)
- Chisel (for hanging)
- Kreg Jig
- Paintable Kreg Plugs
- Orbital Sander & Pads
- Stain (used my ol' favorite)
- Polycrylic (I used this sheen)
Instructions
Prep Your Boards
- Cut your 1"x 6"x 8' boards. You won't want the mug holder to be the full 5.5" deep, so you'll need to rip it down to 4.5."
- Then, you'll want to mark your drill holes 1" above each level, 3/8" from the edge of the front of the board. Drill your rod holes using a 5/16" bit. You will drill through the entire board for the inner 2 boards. For the outer boards, only drill 1/2 through (you don't want to see any holes on the outer sides).
- Once your boards are drilled, you'll want to measure the keyhole hanger, about 3" from the top of the board. Since the forstner bit is 5/8", it's important to very carefully drill into the wood, as it's only about 3/4" wide! Use the bit to remove the wood from the top and bottom for the hanger. Use a small chisel to remove some wood in between.
- Optional: You can install your keyhole hangers now, or wait until you're finished.
- Dry fit your boards to make sure they look straight!
Start Joining Your Boards
- Next you will want to start joining your boards! To make it easier, use a right angle clamp. Your pocket holes should always be on the bottom of each level so that when you are looking at it (and empty of mugs), you don't see any pocket holes. Always down.
- DO NOT Complete the assembly until you read the next step about installing the metal rod!
- To make it as easy as possible, fill in your Kreg plugs and sand them down prior to installing the metal rod. This leaves you with the most room to move around and sand the plugs.
Install the Metal Rod
- As you'll piece it together, you'll end up with one open side. This is where you'll install the metal rod. Cut the rod to 21" for each level.
Simply thread it through the holes and finish the assembly by joining the remaining exterior piece.
Finish the Mug Holder!
- Once your mug holder is assembled, lightly sand it down along the edges using an orbital sander.
- Then, stain it and apply a sealer. We always choose our go-to stain color and sheen.
- Lastly, drill in your keyhole hangers if you didn't do it in the first few steps!
Cost Breakdown of the Rae Dunn Mug Holder
- Boards: $9.50
- Kreg Plugs: $3
- Metal Rod: $5.40
- Keyhole Hangers: $1.75
- Stain & Poly (used leftovers)
- Total Cost: $19.65
And that’s it! It wasn’t nearly as complicated as reading this may appear. 🙂 Once you have your cuts completed and boards ripped to a smaller depth, it’s pretty easy after that. You’ll find that using the Kreg Jig really makes the project easy. Are you a Rae Dunn collector, or do you know someone who needs this? Let me know in the comments!

Hi, I’m Brittany, and I believe life at home should feel easier, not heavier.
I’m the creator of Our Home Made Easy, a space for busy women who want dinner on the table, their homes running smoothly, and a little breathing room at the end of the day.
You won’t find perfection here, just realistic recipes, smart shortcuts, and simple routines that work in real life. The kind that help you feed your family well, stay organized enough, and still have time to actually enjoy it.
If you’re juggling work, kids, schedules, and everything in between, you’re in the right place. I’m so glad you’re here.


Whenever I make pocket holes, they come out much tougher than your holes. Yours looks clean and much more smooth. Is it my drill? My bit is pretty much new. I’ve had the device for a little more than a month and used it on two small projects. Any advice is greatly appreciated! Thank you! And I love this project!
Thanks Katelin! Are you referring to the sides where it splinters a bit? We do a quick sand after making the pocket holes to make it all look a bit nicer. I asked the expert (my husband) and he thought speed [too fast vs too slow] or the type of wood could make a difference. It’s definitely not your new bit or the drill.
I LOVE this idea!! It would look so amazing in my home. I wish I was crafty enough to make it or had all the necessary tools. Is there any way by chance that you all would make one for me?
Thanks Caitlin!
Hi! This is exactly what I am looking for! Do you happen to make these and sell them? If you did I would totally buy one! I can’t find a mug holder with the metal rod like this anywhere ): and I am not crafty enough to make it myself
Hi Katie! Thank you so much for the kind words! Unfortunately, we don’t make & sell them. 🙁 Thank you so much for stopping by!
I loved this! I wanted to share the photo of the one I made, following most of your steps, but I made it for 16! It won’t let me upload, but thank you so much for sharing!
16 sounds so cool, Beka! I’d LOVE to see it still! Can you send me a photo at brittany@ourhomemadeeasy or tag me on IG? Take Care, Brittany
Such a great build!!!! Can I ask what stain color you used from Minwax? We LOVE THE COLOR.