Hexagon DIY Wood Pumpkins
A few weeks ago I revealed our front porch looking all jazzed up for fall time. And I’ve already shared how you can style your own front porch, an easy DIY Wood sign is coming later this week (it’s here!), and this post (whew!) is the super easy scrap DIY wood pumpkins!
And guys….. this was not my idea I’m going to throw that out right now. Jordan surprised these for me. Well, he surprised me with one medium sized pumpkin and then I followed it up with, “You know we should decorate in threes, right?”
Sorry, babe! 😉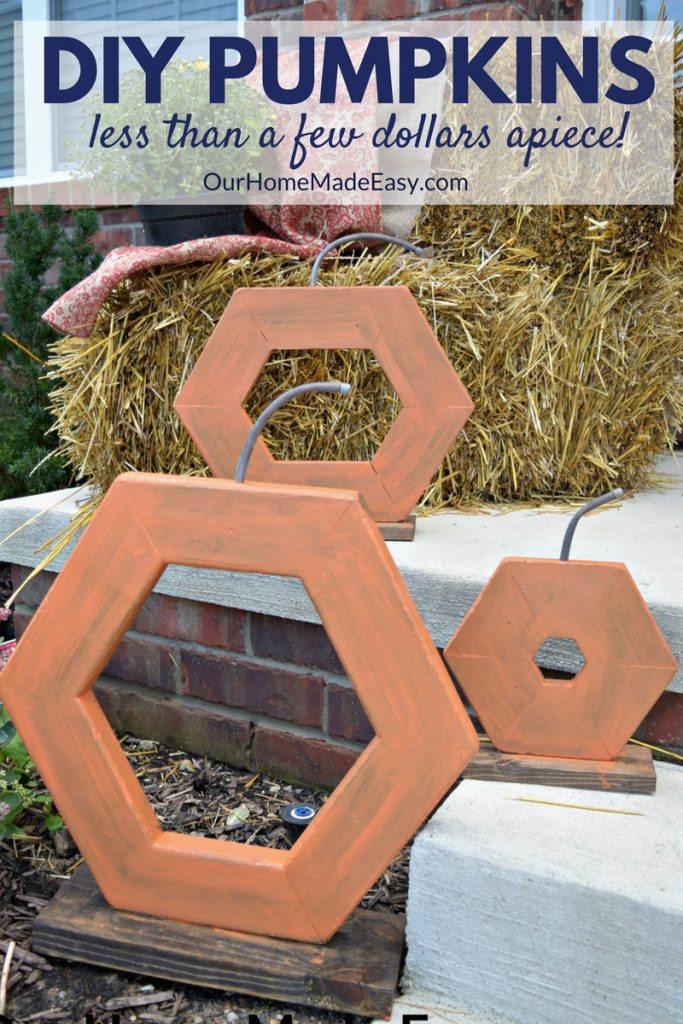
These were built with scrap 1″ x 4″ and 2″ x 4″ lumber that Jordan had lying around. Even if you have to run to the store, you should be able to make these for less than a few dollars apiece. Score!
I also love that you can choose the color dependent on your personal style. Dark stain and cream for farmhouse lovers, skip the stain and go dark orange for the pumpkin purists! I know I could love these styled several different ways.
This post contains affiliate links. If you shop from my blog, I may be compensated for clicks or purchases that you make. Read my disclaimer page for more information.
Supplies Needed for a Hexagon DIY Wood Pumpkins
- 1″ x 4″ or 2″ x 4″ piece of lumber (You may want pressure treated)
- Lumber for base (we used 1″ x 4″ for the small & medium, 2″ x 6″ for the large pumpkin (it need extra stability!))
- Miter Saw
- Kreg Jig
- Kreg Screws
- Orbital Sander
- Stain of Choice (We used this one)
- Paint Sample
- White Cloth for Staining (You’ll need several!)
- Power Drill
- Forstner Bit
- Flexible Copper Tubing
- Copper Caps
- Copper Cutting Tool
- Ammonia
- Vinegar
Cutting Your Pieces
Choosing a 1″ x 4″ piece of lumber would work well for small pumpkins, indoor pumpkins, or an area that doesn’t have a lot of depth. Making the larger ones out of 2″ x 4″ lumber made them very heavy. Choose your base on the size of the pumpkin you’d like.
Four of your sides will be the same length. The top & bottom are their own length. This is where you could choose to have short and wide pumpkins, or tall and lean pumpkins. It’s really dependent on the space you have available. Cut 6 pieces of lumber. Then, you will make 12 angled cuts (1 on each end). Each cut is approximately 30 degrees.
For us we have three sizes:
Small Pumpkin: 5.25″ for all the pieces
Medium Pumpkin: 8″ cuts for 4 pieces, the top & bottom are 9.5″
Large Pumpkin: 11″ cuts for 4 pieces, the top & bottom are 10″
Lastly, cut a base piece for attaching your pumpkin.
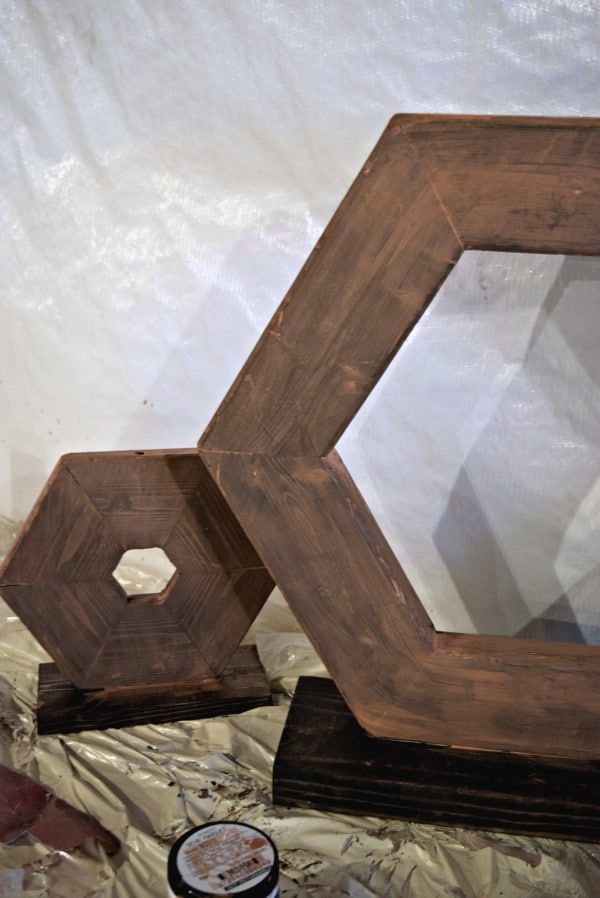
Assembling your Pumpkin
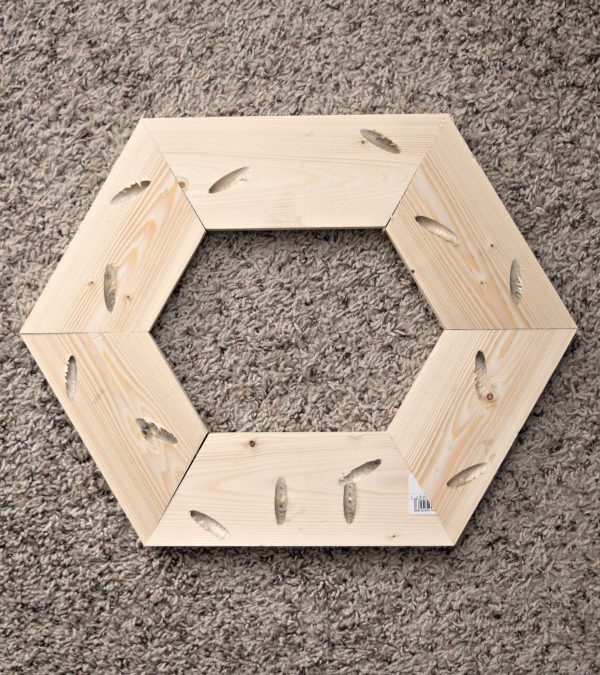
Using your KregJig, screw together the board using the picture above as a guide. Sand down the edges to soften the look of your pumpkin. In the photo below you can see how we tried to distress the sides of the pumpkin.
Once you have the pumpkin assembled, attach the pumpkin to your base board. To attach, you will use the two holes that are facing straight down in the picture above.

- Related Post: Easy Wood Tray with the KregJig
Creating the Stem
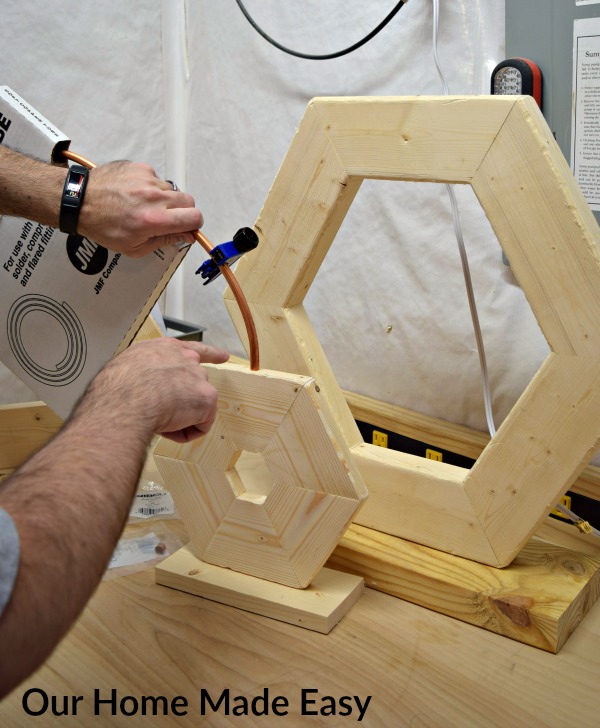
Drill a 3/8″ hole (or your copper diameter) into the top of the pumpkin. Place copper into the hole and bend into desired shape. Cut the copper at desired length. Remove and set aside for later.
Finishing the Pumpkin
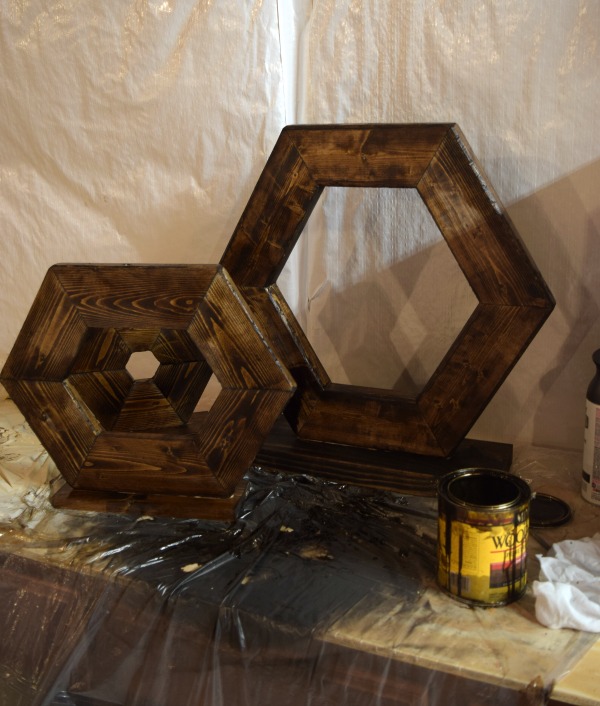
Now the fun part! I wanted to match these pumpkins to my Harvest Sign, so I followed the same colors as the sign. In doing this, I coated the entire piece with stain.
- Related: Easy DIY ‘Harvest’ Sign
Then, I used a white cloth and applied the orange paint. Using another white cloth, I quickly wiped the paint off to give it a distressed appearance. I ended up giving the pumpkins a second coat of paint to make the orange stand out a little more.
Here you could do any of the color ideas that I mentioned above or even take out your sander and really distress it. Have I mentioned how much I love the versatility of these little guys?
- Related Post: How to Style a Front Porch in 5 Steps
Patina the Copper
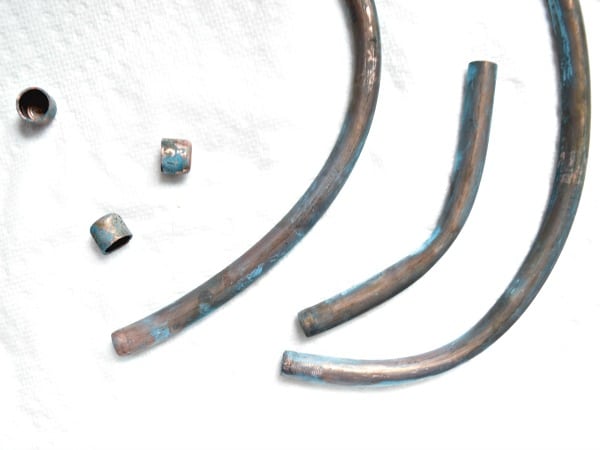
Well…. we are not chemists, so go with us on this part. In a red Solo cup (seriously), I mixed equal parts ammonia and vinegar. Then I dropped the 3 copper stems and caps. After a few seconds I removed them and set them on a paper towel to dry. As soon as they were exposed to oxygen, they turned a cool patina! I love them (and shout out to Jordan for thinking of this detail)!
Finally, hot glue your stems into your pumpkins and glue on the caps.
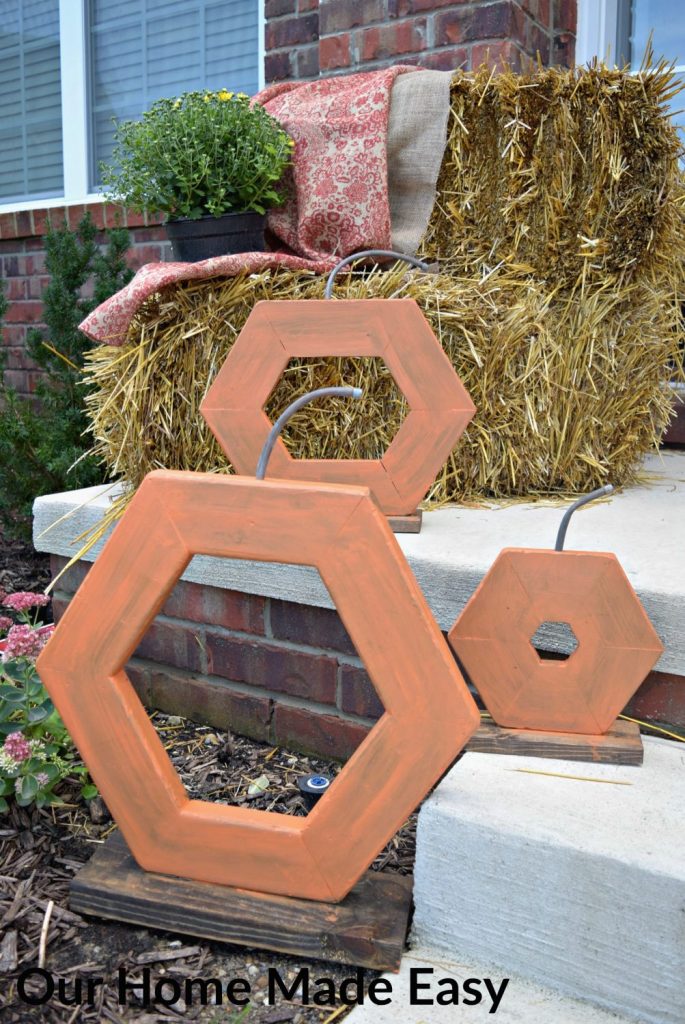
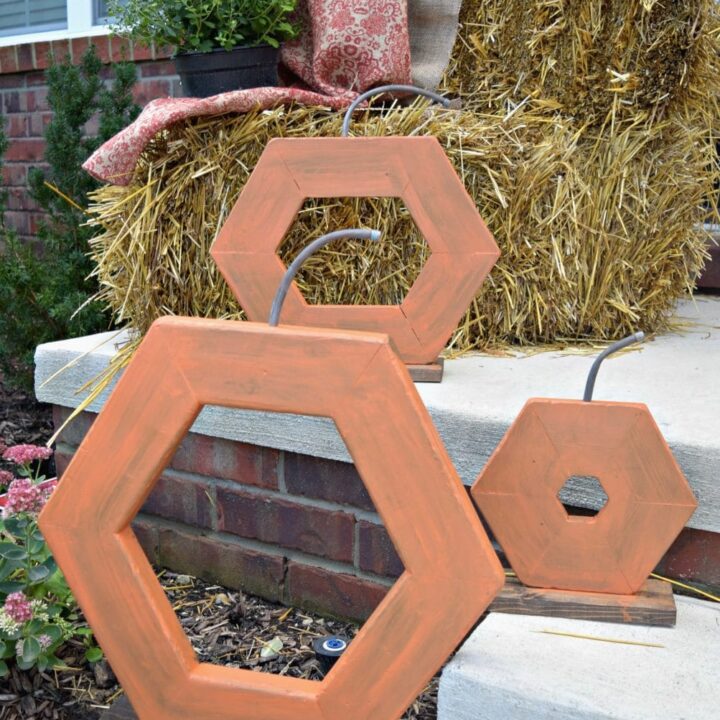
DIY Hexagon Wood Pumpkins
These easy hexagon wooden pumpkins are super cute and modern-style Fall decor that will look perfect on your Fall themed front porch.
Materials
- 1″ x 4″ or 2″ x 4″ piece of lumber
- Lumber for base (we used 1″ x 4″ for the small & medium, 2″ x 6″ for the large pumpkin
- Stain of Choice
- Paint Sample
- White Cloth for Staining
- Flexible Copper Tubing
- Copper Caps
- Ammonia
- Vinegar
Instructions
- Choosing a 1″ x 4″ piece of lumber would work well for small pumpkins, indoor pumpkins, or an area that doesn’t have a lot of depth. Making the larger ones out of 2″ x 4″ lumber made them very heavy. Choose your base on the size of the pumpkin you’d like.
- Cut 6 pieces of lumber. Then, you will make 12 angled cuts (1 on each end). Each cut is approximately 30 degrees.
- Lastly, cut a base piece for attaching your pumpkin.
- Using your KregJig, screw together the board using the picture above as a guide. Sand down the edges to soften the look of your pumpkin.
- Once you have the pumpkin assembled, attach the pumpkin to your base board.
- Drill a 3/8″ hole (or your copper diameter) into the top of the pumpkin. Place copper into the hole and bend into desired shape. Cut the copper at desired length. Remove and set aside for later.
- Coat the entire pumpkin with stain.
- Then, I used a white cloth and applied the orange paint. Using another white cloth, I quickly wiped the paint off to give it a distressed appearance.
- In a red Solo cup (seriously), I mixed equal parts ammonia and vinegar. Then I dropped the 3 copper stems and caps. After a few seconds I removed them and set them on a paper towel to dry. As soon as they were exposed to oxygen, they turned a cool patina!
- Finally, hot glue your stems into your pumpkins and glue on the caps.

Hi, I’m Brittany, and I believe life at home should feel easier, not heavier.
I’m the creator of Our Home Made Easy, a space for busy women who want dinner on the table, their homes running smoothly, and a little breathing room at the end of the day.
You won’t find perfection here, just realistic recipes, smart shortcuts, and simple routines that work in real life. The kind that help you feed your family well, stay organized enough, and still have time to actually enjoy it.
If you’re juggling work, kids, schedules, and everything in between, you’re in the right place. I’m so glad you’re here.


